Shawn Meyers (@1dizzygoose), Principal Architect
In the course of our travels, we have deployed Availability Groups (AG) for many of our clients. One of the questions that comes up over and over again is “how are we supposed to patch the AG?” This blog provides a checklist for the proper procedures for the AG, including OS and SQL Server patches. First, I will give you a list of the steps and then walk you through the steps in more detail and explain the reasoning behind them.
In my scenario, we have a three node AG (node A, B, and C). Note that the node C is a DR node on a different subnet.
Checklist
Pre-work
- Determine the patches you will apply
- Check blogs for any known issues (SQL Server patches)
- Read release notes
- Schedule deployment time (potentially within your normal maintenance window)
Patching window
- Verify last backup job(s) ran successfully
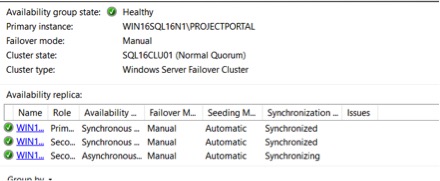
- Verify the Availability Group is healthy
- Pause log backup jobs
- Snapshot all current non-primary nodes (secondary) – nodes B and C
- Remove the ability to automatically failover to any node which is currently being patched – node B
- Patch all non-primary nodes (secondary) – node B and C (reboot as needed)
- Verify everything is in a healthy state
- Take snapshot of node A
- Validate that no SQL Agent jobs are running
- Failover primary to a synchronized patched node (edit AG to make DR synchronous if needed)
– Failover from node A to node B - Validate failover has been completed and that items are in sync
- Remove the ability to automatically failover to node A
- Patch node A
- Verify node A is back online and in sync
- Edit AG to allow for automatic failover
- Leave node B as primary
- Re-enable the log backup job
- Remove all snapshots (remove the snapshot on the primary node last)
You can follow these steps, and you should be fine. Keep reading if you have questions however, as the remainder of this blog provides further details on the process.
I will be using a Windows 2016 box with SQL Server 2016 as my lab. The lab has multiple instances of SQL Server installed and multiple editions as well. There are three nodes, two for HA and one serving as a DR node on a separate subnet.
Prework
First select which patches you want to apply. Windows updates follow the rules the rest of the organization is following. However, security patches should be reviewed for risk and applied based upon those risk factors. For SQL Server service packs, I like wait three months after they are released, and for Cumulative Updates (CUs) I wait six weeks. These works best for me, but many others have similar or different timeframes, so use whatever feels comfortable as long as it makes sense for your environment.
Aaron Bertrand and Glenn Berry tend to blog about any issues or news related SQL Server updates, and are my favorite two bloggers on data for updates and patching. You can also check in with #SQLHelp, and if there is an issue with a patch it will be listed.
Be sure to read the release notes. I know most people skip this step, thinking that if there is a blog about the release then they should cover important changes. But many CUs and service packs now add features, and an easy way learn about them is by reading the release notes.
Schedule your window, and as most organizations have pre-scheduled periods for maintenance, I am going to assume that you have one.
Patch Time
Double check you have valid backups, which is pretty self-explanatory.
Open the AG dashboard and make sure everything is healthy. Ensure the ‘Log Send Queue Size’ and ‘Redo Queue Size’ are both clear. If things are far behind, the AG could still show green.
Pause the log backup job, which allows for a rollback from snapshots. If something goes wrong and you need to revert to a snapshot, the AG will do all of the work for you, if there have been no log backups. If log backups have been taken, you will need to apply those log backups to the node you reverted the snapshot on, and then the AG will pick up where it left off. I described this process more fully in a blog last year.
If the SQL Server is virtual, take a snapshot of the non-primary nodes. Not all DBAs have access to take snapshots, and these snapshots should not stay in place very long as they can impact performance. If your virtualization admins will not grant you snapshot permissions, then they will need to be available during the patching windows. Many ask ‘Why take a snapshot’? The short answer is that they offer the ability to recover quickly. I have seen many different Windows patches over the years cause issues with an OS, but instead of spending any length of time trying to fix the OS, I just revert to the snapshot. The same is true for the rare SQL Server patching issue, I don’t want to spend time trying to fix it, so instead I revert back to the snapshot.
Remove the ability to failover automatically. For the HA nodes, you do not want SQL Server to attempt to failover when patches are being applied, especially the SQL Server patches. This is a step most people skip, as the risk of a failover is lower, but it can be very costly if it does happen. Select the properties for the AG and change the failover mode to manual for all nodes.
Apply the patches as needed. In this go round, I am applying SQL Server SP2 to the lab servers. Currently they are on SP1, CU 10 with a security update.
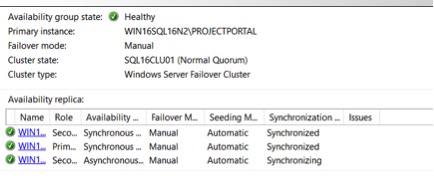
Now all the non-primary nodes are patched and the AG shows green again. WIN16SQL16N1 is the primary and is running the older version.
Take a snapshot of the primary node prior to failover. Depending upon the SQL Server patch applied, the database version may be changed. If the database version is changed, once the database runs the new version, it can no longer be rolled back. If the patch causes issues, and you failover to the newly patched server, you cannot failback to the original server. Instead you will have to perform a restore or revert to the snapshot, which is another reason why I like snapshots. Now all nodes will have a snapshot.
Validate that no SQL Agent jobs are running. Nothing is worse than having a two-hour ETL job interrupted and needing be rolled back because you failed over without checking, and the failover takes forever.
Next, failover from the unpatched node to a patched node. If you only have a DR node, and not a HA node, you may need to change the ‘Availably Mode’ to synchronous to allow a failover to DR without data loss. Once you failover to a DR node, it may be several minutes before the DNS updates and depends upon how your DNS and AD replication are setup, as well as how long the ‘Host Record TTL’ value is set for.
Validate everything is back in sync before proceeding. It may take a couple of minutes, but most likely will only take a couple of seconds.
Patch the unpatched node.
Verify things are back online and everything is in sync.
Edit the AG to allow automatic failovers again, per the design of the AG.
If you have HA nodes, leave the primary where it is. You should rotate which HA node is the primary node on a regular basis to prevent any issues with accounts, file paths, or any number of things from happening, which can cause errors when a certain node is not primary. At House of Brick, we run into this issue all of the time.
Finally, re-enable the log backup job.
Now that everything looks good, remember to remove the snapshots prior to running the full workloads, as the snapshots will cause performance problems.


