


Andy Kerber, Senior Consultant
The intent of this series of posts is to cover basic Oracle skills for the beginning DBA. These are follow-on posts to my previous article titled ‘Eleven Critical Skills for the Beginning DBA’.
I debated with myself for some time on how detailed I need to be, and at what point in the installation process I should begin this article. After some consideration, I have decided to start this entry with the installation of Oracle required packages.
This article assumes that the Oracle user has been created per the Oracle installation documentation, that transparent hugepages have been disabled, and that the required kernel setting changes have been made for an Oracle installation.
I considered it unlikely that the beginning DBA would be entrusted with those three preliminary tasks in a typical working environment.
Admittedly, the beginning DBA may well not be entrusted with installing packages either, but that was the point that I chose to start this article.
Step 1 – Install the Oracle Required Packages
Installing the Oracle required packages is straightforward. And in fact remarkably easy if you are on Oracle Enterprise Linux (OEL). First of all, your database server must be configured with repository access for its Unix version. Without repository access, none of the yum commands below will work.
Next, if you are on Oracle Enterprise Linux, install this package: oracle-rdbms-server-12cR1-preinstall or if you are installing 11g, install this package: oracle-rdbms-server-11gR2-preinstall. The command is simply (as root):
# yum install oracle-rdbms-server-12cR1-preinstall
or
# yum install oracle-rdbms-server-11gR2-preinstall
This will install all the oracle required packages, and configure the Oracle user, and set certain OS settings. This is the easiest way to do it. If you are using Oracle Enterprise Linux, you can skip to Part 2: Setting up Xwindows on your Dekstop.
If you are not using Oracle Enterprise Linux, you will need to install the individual packages by themselves, and configure the operating system as described in the remainder of this article.
The current list of required packages from 12c is below (note: tuned and xclock are not required, but are highly recommended):
binutils.x86_64
compat-db43.i686
compat-glibc-headers.x86_64
compat-glibc.x86_64
compat-libcap1.x86_64
compat-libstdc++-33.i686
compat-libstdc++-33.x86_64
elfutils-libelf-devel.x86_64
gcc-c++.x86_64
gcc.x86_64
gdbm.i686
gdbm.x86_64
glibc-common.x86_64
glibc-devel.i686
glibc-devel.x86_64
glibc-headers.x86_64
glibc.i686
glibc.x86_64
kernel-headers
ksh.x86_64
libaio-devel.i686
libaio-devel.x86_64
libaio.i686
libaio.x86_64
libgcc.i686
libgcc.x86_64
libgomp.x86_64
libstdc++-devel.i686
libstdc++-devel.x86_64
libstdc++.i686
libstdc++.x86_64
libXi.i686
libXp.i686
libXp.x86_64
libXtst
make.x86_64
mksh.x86_64
ncompress
nfs-utils
openmotif21.i686
portmap
sysstat.x86_64
unixODBC-devel.i686
unixODBC-devel.x86_64
unixODBC.i686
unixODBC.x86_64
unzip.x86_64
util-linux-ng.x86_64
xauth
xorg-x11-libs-compat.i386
xorg-x11-utils.x86_64
tuned
xclock
In order to install all of these packages quickly (as the root user), just build a shell script with these lines: and run it:
yum -y install binutils.x86_64
yum -y install compat-db43.i686
yum -y install compat-glibc-headers.x86_64
yum -y install compat-glibc.x86_64
yum -y install compat-libcap1.x86_64
yum -y install compat-libstdc++-33.i686
yum -y install compat-libstdc++-33.x86_64
yum -y install elfutils-libelf-devel.x86_64
yum -y install gcc-c++.x86_64
yum -y install gcc.x86_64
yum -y install gdbm.i686
yum -y install gdbm.x86_64
yum -y install glibc-common.x86_64
yum -y install glibc-devel.i686
yum -y install glibc-devel.x86_64
yum -y install glibc-headers.x86_64
yum -y install glibc.i686
yum -y install glibc.x86_64
yum -y install kernel-headers
yum -y install ksh.x86_64
yum -y install libaio-devel.i686
yum -y install libaio-devel.x86_64
yum -y install libaio.i686
yum -y install libaio.x86_64
yum -y install libgcc.i686
yum -y install libgcc.x86_64
yum -y install libgomp.x86_64
yum -y install libstdc++-devel.i686
yum -y install libstdc++-devel.x86_64
yum -y install libstdc++.i686
yum -y install libstdc++.x86_64
yum -y install libXi.i686
yum -y install libXp.i686
yum -y install libXp.x86_64
yum -y install libXtst
yum -y install make.x86_64
yum -y install mksh.x86_64
yum -y install ncompress
yum -y install nfs-utils
yum -y install openmotif21.i686
yum -y install portmap
yum -y install sysstat.x86_64
yum -y install unixODBC-devel.i686
yum -y install unixODBC-devel.x86_64
yum -y install unixODBC.i686
yum -y install unixODBC.x86_64
yum -y install unzip.x86_64
yum -y install util-linux-ng.x86_64
yum -y install xauth
yum -y install xorg-x11-libs-compat.i386
yum -y install xorg-x11-utils.x86_64
yum -y install tuned
yum -y install xclock
The above commands will install the required packages without prompting for further user input.
Part 2: Setting up X-Windows on Your Desktop
Thinking back to my early days as a DBA, I remember getting the X-windows configuration figured out was one of the most irritating pieces of the process. After all, who uses X-windows anymore? The answer of course is Oracle. So here are the steps to set it up on the server and on your desktop.
First of all, make sure X-windows is installed on the Linux/Unix system. The easiest method for doing this is to check for the existence of the X11 packages on the system using the rpm command:
$ rpm -qa | grep X11
libX11-1.6.0-2.2.el6.x86_64
libX11-1.6.0-2.2.el6.i686
libX11-common-1.6.0-2.2.el6.noarch
If these packages do not show up, you will need to install X on the server. This requires root access, which may require discussion with the system administrator. The command to install X11 is this:
# yum install xorg-x11-apps
After identifying the application and all the required prerequisites, yum will prompt for an OK to install the package. Enter Y and the packages will be installed.
Step 2, Installing an X-Server
Next, you will need an X-Server on your desktop. There are several available, the most common of which are Xming and Cygwin. Generally Xming has the smaller footprint, so it is what I recommend. Xming can be downloaded from here:
http://sourceforge.net/projects/xming/files/
Install xming for your software version onto your Desktop, and also download and install xming fonts.
Next, you will want an SSH software that supports X11 forwarding. The most common software for this is Putty. Putty can be downloaded from here:
http://www.putty.org/
Download the full putty installer for your version of windows, and install putty using the default options.
Next, start up Xming.
Use the X-Launch icon under the xming group, and choose the defaults, but select the box for ‘No Access Control’. Later you can experiment with unchecking the box, but for now turn it on. Once XLaunch finishes, you will see an Xming icon in your running programs, which is what you want.
Next, start up putty. Enter your hostname on the appropriate line.
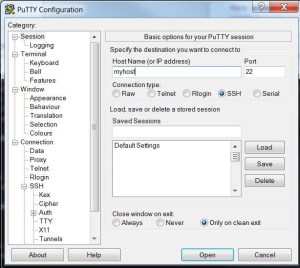
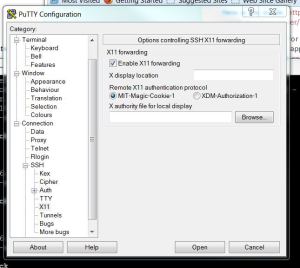
Then on the left side, under connection, click on SSH, then X11. In the X11 window choose the ‘Enable X11 Forwarding’ box. In the ‘X display location.’ You can enter ‘localhost’, though that is not required.
Next, open your putty session to the database server (click on ‘open’) in the session window, and log in as the Oracle user, if possible.
Then, if you are logged in as the Oracle user, run this command:
$ xclock
At this point, a small clock should show up in a window showing the current time. This indicates that you have X-Windows properly configured on the Oracle server, and that your Xserver is running properly on your desktop, so you can run the Oracle installer.
If xclock does not start, run this command (on the server):
export DISPLAY=localhost:10.0
And try again.
If you are not logged in as the Oracle user, but as yourself, do the following:
$ xauth list
myhost/unix:10 MIT-MAGIC-COOKIE-1 206e9b7808ad8cbf561dd6b2e42a29a7
Copy the above line (that begins with your host name). If the output has multiple lines, copy the last line to the clipboard. Then, sudo or su to the Oracle user, whichever method is available to you.
After switching to the Oracle user, run this command (replacing everything after add with your output from the above xauth list command):
$ xauth add myhost/unix:10 MIT-MAGIC-COOKIE-1 206e9b7808ad8cbf561dd6b2e42a29a7

$ xclock
At this point, a small clock should show up in a window showing the current time:

Once again, if xclock does not start, run this command (on the server):
export DISPLAY=localhost:10.0
And try again.
If the clock shows up, it indicates that you have X-Windows properly configured on the Oracle server, and that your Xserver is running properly on your desktop.
Now we are ready to install Oracle on Linux using the Oracle installer. Hit ctl-c to exit the xclock.
This blog originally appeared on https://dbakerber.wordpress.com.