


House of Brick Principal Architect
Welcome to part four in our series of posts regarding the virtualization of your Business Critical SQL Servers. This installment continues our discussion detailing how to configure a new SQL Server instance on VMware to get the most performance out of the infrastructure you have just constructed.
You Are Ready Install SQL Server
A number of SMEs state that best practice is to separate all objects within the SQL Server environment onto different hard drives. I completely agree with their assessment, and I suggest that those drives are configured similarly to this:
C: Operating System
D: SQL Server home + master/model/msdb system databases
E: User Databases Data files (one or more drives, as needed)
F: User Database Log files (one or more drives, as needed)
G: TempDB data and log files
By separating these objects into different VMDK files, you gain a level of flexibility that is unparalleled. You now have the ability to snapshot certain drives so that you have a back-out plan for all major patch and upgrade scenarios. You can move the VMDKs around via Storage vMotion to place each on the appropriate tier of disks. VMDKs can also be moved transparently to the operating system if/when the need arises.
Please remember to use the VMware Paravirtual SCSI (PVSCSI) driver for all non-C: drives, the positive performance and CPU impact is measurable.
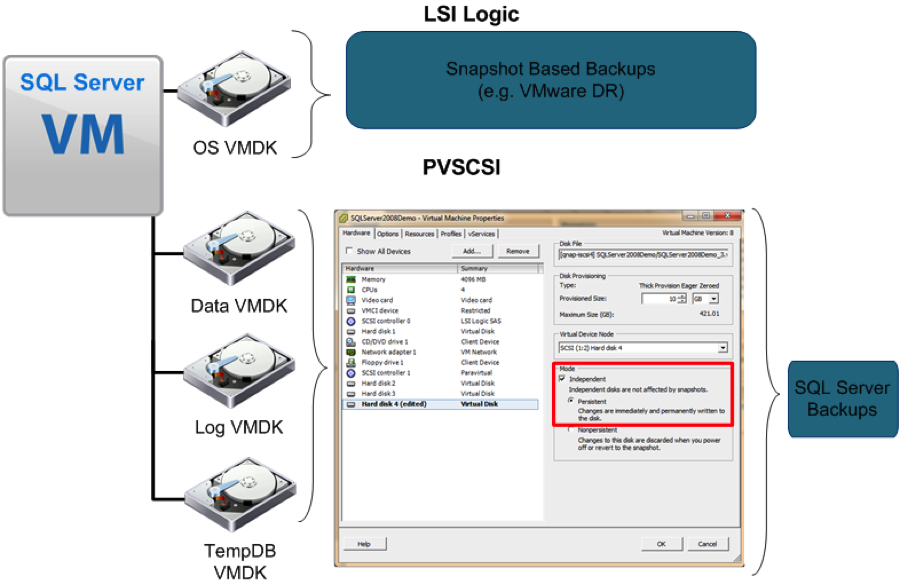
By separating these objects, you also contribute to greater flexibility with disaster recovery and backup options. You could perform SAN-to-SAN replication of your operating system and SQL Server home but opt to exclude replicating your TempDB because it isn’t necessary to replicate these temporary objects.
You can perform selective backups with your backup strategy for the OS level and exclude the databases. You have the power to set up backups and DR for whatever configuration your organization demands.
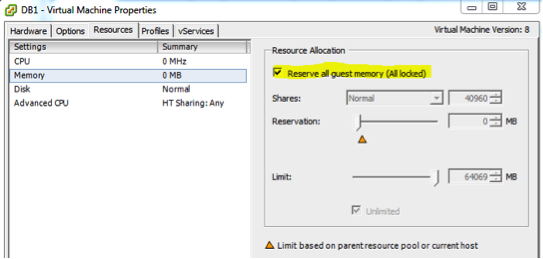
Next, set a full memory reservation on your virtual machine. I know that I mentioned this in the previous post, but I consider this absolutely mandatory. You do not need your overzealous VMware administrator overcommitting your host and placing your SQL Server in jeopardy of memory ballooning.
Instance Level Configuration
Once SQL Server is installed, install your service packs and cumulative updates as required. Make sure Windows is fully patched to your organization’s appropriate levels.
Next, let’s go through the base instance configuration details.
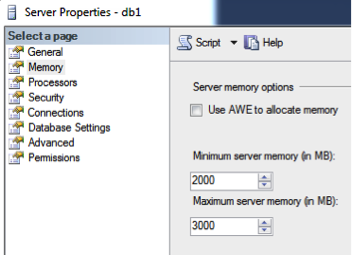
Set your minimum and maximum server memory. By default, SQL Server is set to effectively consume all available memory on the computer. Occasionally Windows and SQL Server can battle over the last bit of available memory. No one wins in that situation, and instability issues are sure to follow.
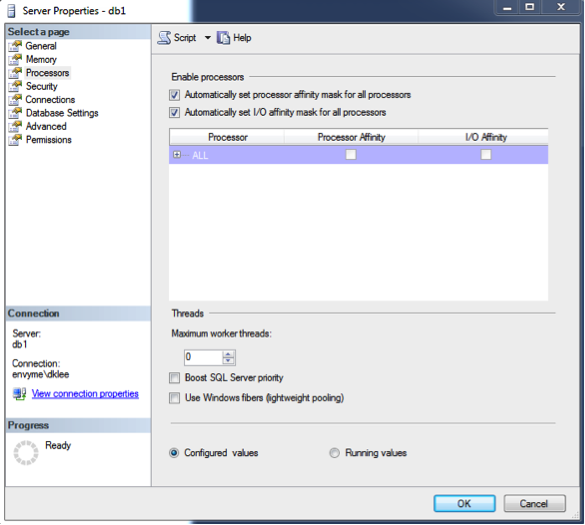
Please do not do anything crazy with CPU Affinity by default. Only under the rarest circumstances do I ever see this setting set to a nonstandard configuration. The same thing goes for ‘Use Windows fibers (lightweight pooling)’–this setting also breaks the SQLCLR.
Please enable ‘Optimize for Ad hoc Workloads.’ It helps minimize the plan caching for single-use ad-hoc queries and can save considerable memory over time on a busy system for systems that handle a lot of these queries. This means you, SharePoint.
On this same screen, I generally set the ‘Max Degree of Parallelism’ to the number of physical (not hyperthreaded) cores in a single NUMA node. This particular setting should be tested very thoroughly before it is put into production. However, I usually find better performance when this setting has been configured properly because the SQL Server engine is now keeping related activity on one physical CPU.
I also take Kimberly Tripp’s advice on setting up a jog to run periodically to clear out some of the stale or single-use plans that this setting does not handle. Please reference the blog post for more details.
Service account details also matter. I always enable ‘Lock Pages in Memory’ for the SQL Server service account so that Windows cannot try to steal memory from the SQL Server buffer pool. I always configure ‘Instant File Initialization’ so that data files can grow immediately instead of experiencing the lag associated with zeroing out the space required to grow a data file. This can save you quite a lot of time in the event of an emergency restore.
Database-Level
Since databases are usually out of our reach for a lot of our scenarios, I try to touch on a few details that are not dictated by vendors or third-party applications. The first, virtual log files (VLFs), are an easy item to clean up. Too many VLFs mean a much greater time to recover or restore in the event of a problem. Details on VLF count checks and proper configurations are found here.
I also like to configure the number of TempDB data files to a number greater than the default of one. Generally I start with two or four, depending on the number of vCPUs that are allocated to the virtual machine. If I notice TempDB contention taking place, I will increase this number by half a NUMA node’s core count per increase until the contention stops. Keep in mind that this number should be reasonable and probably should not exceed 16.
Maintenance
For almost all SQL Server maintenance-related items on servers that I control, I use the Ola Hallengren (http://ola.hallengren.com ) maintenance solution. It is leagues above the built-in maintenance plans, and performs routine database maintenance items such as: full/diff/log backups, index and statistic maintenance, database integrity checks, and work file cleanup tasks. All you need to do is put a backup target path when you execute the setup script to create the jobs required in the SQL Server Agent.
Once the jobs are created, I usually make a small tweak to the User and System database backup jobs. It involves a setting called Buffer Count. Essentially, it is a tweak that allows you to grant more memory as a read-ahead buffer for the SQL Server backup task’s data reader. Edit the job step and add the following bit of code into the line.
Experiment with the setting and see which gives you the best performance improvement. I usually find that a value of 75 works the best. To demonstrate the performance difference, you can back up a database to ‘NUL’ to test your disk sequential read performance.
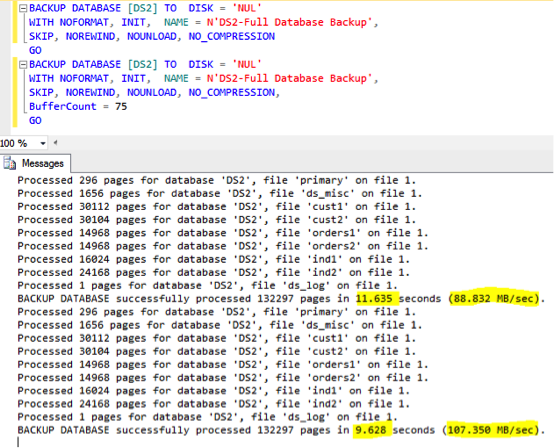
Not too shabby for a single modification, eh? Experiment with this value in your test environment and, when ready, move it to production. Make sure to set your SQL Server maximum memory setting so that you ensure the backup process has enough memory available for this operation.
Next, make sure that your indexes are the least fragmented and statistics up to date as much as possible. Ola Hallengren’s maintenance solution should be able to handle this one for you, so test and schedule this as required.
Final Part
In the final part of this series, I discuss high availability and disaster recovery options with SQL Server on VMware. Topics will include SQL Server clustering and SQL Server 2012 AlwaysOn.
By the end of this series, you should no longer have any questions whether the VMware platform is truly capable of hosting your Business Critical SQL Servers. At this point, the technology has proven itself to be completely capable of handling the workload. The last topic that I will comment on in this series is the challenge behind Business Critical Virtualization at the organizational level, where people require the most focused effort to help change their minds. I will discuss techniques used to help demonstrate the power of virtualization and discuss the benefits aimed to individuals that might continue to fear or not understand virtualization.
Check back soon for the last installment!