


Phil Ekins (@SQLPhilUK), Principal Architect
In our prior posts in this series we discussed Linux basics and provided a how to for installing Linux. This post picks up the story from that point, with us prepping our server for a SQL Server install and doing the basic configurations for preparing this server for production readiness.
The first step is to tell Linux where to find the latest SQL Server binaries, a repository in Linux terms. The three flavors of Linux (Red Hat, SUSE and Ubuntu) each have a different process on how to do this, but conceptually they are the same. Reference this document from Microsoft to confirm the latest repository path for each Linux platform. We will be using the Ubuntu repository for this blog post.
For the following steps we will be switching to root privileges.
su -
For adding the repository, we will need the add-apt-repository command so we will install that here.
apt install software-properties-common
We have the same consideration as Windows on whether to follow Cumulative Update (CU) or GDR Updates. In Linux, we have two different repositories to set dependent upon that business decision. For this post we will select the CU repository.
For CU the command is:
add-apt-repository "$(wget -qO- https://packages.microsoft.com/config/ubuntu/16.04/mssql-server-2017.list)"
For GDR the command is:
add-apt-repository "$(wget -qO- https://packages.microsoft.com/config/ubuntu/16.04/mssql-server-2017-gdr.list)"
First, we will import the repository GPG keys:
wget -qO- https://packages.microsoft.com/keys/microsoft.asc | apt-key add –
Then import the CU repository
add-apt-repository "$(wget -qO- https://packages.microsoft.com/config/ubuntu/16.04/mssql-server-2017.list)"
Then run apt-get update to get the latest packages from the newly added repository:
apt-get update
We will now exit the root account:
exit
We are now ready to install SQL Server.
Things to note here, we will not be able to control the default locations at install, but we will fix them post configuration. Additionally we, by default, will be installing the latest CU build level of SQL Server 2017. We will also consider update and rollback options.
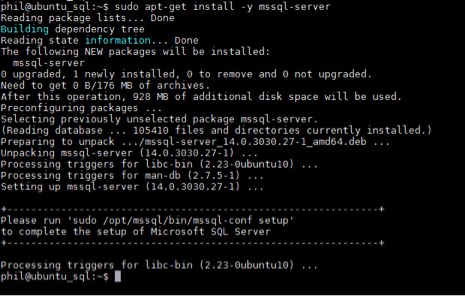
Installing SQL Server:
sudo apt-get install -y mssql-server

Note here that we installed mssql-server (14.0.3030.27-1), which is the latest version available.
Let’s go ahead and uninstall SQL Server and try to install a lower CU.
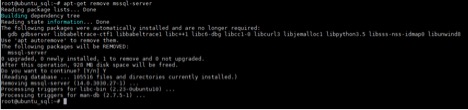
sudo apt-get remove mssql-server
Now let’s try installing the prior CU. Note, the version parameter here is the package version. Check the release notes here for the CU version. You will need to scroll down to the CU details for the “-#” that reflects the package version.
sudo apt-get install mssql-server=14.0.3029.16-1

We now have version 14.0.3029 installed. To patch our existing install to the latest version, we simply run the install command again.
sudo apt-get install -y mssql-server
We are now back to running the latest build of SQL Server.
Next, as the install says, we need to run the mssql-conf command to configure SQL Server.
sudo /opt/mssql/bin/mssql-conf setup
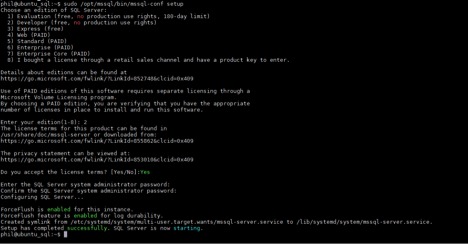
We need to select the desired edition, Developer in this case. Review the license terms, select ‘Yes’ to accept them and then enter the system administrator (sa) password.
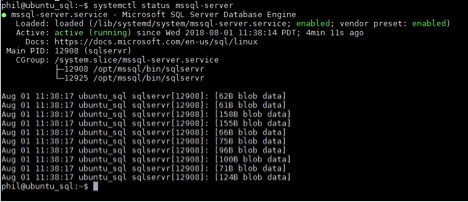
Let’s confirm SQL Server is running:
systemctl status mssql-server
As of RTM-CU4, the SQL Server Agent is included with the engine install but is disabled by default. To enable it we will run the following commands.
sudo /opt/mssql/bin/mssql-conf set sqlagent.enabled true
sudo systemctl restart mssql-server
We will also install the command line tools, as they will be needed later.
sudo add-apt-repository "$(wget -qO- https://packages.microsoft.com/config/ubuntu/16.04/prod.list | sudo tee /etc/apt/sources.list.d/msprod.list)"
sudo apt-get update
sudo apt-get install mssql-tools unixodbc-dev
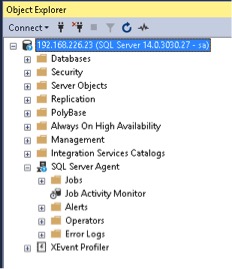
We are now able to connect with SQL Server Management Studio (SSMS).
Currently we do not have a firewall running on this server. However, these days in the Windows world we are seeing firewalls enabled about 50% of the time, so let’s do it here to show the steps.
We need to enable the firewall and add rules for 1433, 1434 and 22 (for SSH).

sudo ufw enable


sudo ufw default allow outgoing
sudo ufw default deny incoming


sudo ufw allow 1433
sudo ufw allow 1434
sudo ufw allow 22
Currently the configuration is set to default settings. Let’s start making the necessary changes to get this build production ready.
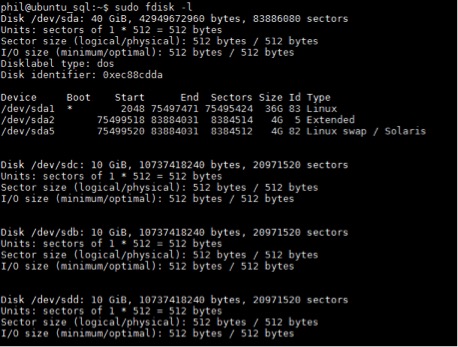
This server has four drives attached:
- /dev/sda – OS is installed here
- /dev/sdb – Future home of Data files
- /dev/sdc – Future home of Log files
- /dev/sdd – Future home of TempDB files
We will be creating a directory /sql and mounting these three drives as directories below. This follows the same logic as mount points in Windows.
We can list the attached drives with the following command:
sudo fdisk -l
We will be using the Logical Volume Manager, so it will need to be installed.
sudo apt install lvm2
Create the /sql directory and the additional directories needed.
sudo mkdir /sql
sudo mkdir /sql/data /sql/logs /sql/tempdb
sudo mkdir /sql/backup /sql/diag /sql/errorlog /sql/scripts /sql/diag/dump
Finally, we need to set the ownership and permissions on the install directory /opt/mssql as well as for the new directories we have created /sql.
cd /opt
sudo chown -R mssql:mssql mssql
cd /
sudo chown -R mssql:mssql sql
sudo chmod -R 755 sql
Now lets create the Physical Volumes.
sudo pvcreate /dev/sdb /dev/sdc /dev/sdd
The next step is to create the Volume Groups.
sudo vgcreate -s 128M data_vg /dev/sdb
sudo vgcreate -s 128M logs_vg /dev/sdc
sudo vgcreate -s 128M tempdb_vg /dev/sdd
Then we create the Logical Volumes.
lvcreate -l 100%FREE -n data_lv data_vg
lvcreate -l 100%FREE -n logs_lv logs_vg
lvcreate -l 100%FREE -n tempdb_lv tempdb_vg
Next create file systems for each of the Logical Volumes.
sudo mkfs -t ext4 -m 1 /dev/mapper/data_vg-data_lv
sudo mkfs -t ext4 -m 1 /dev/mapper/logs_vg-logs_lv
sudo mkfs -t ext4 -m 1 /dev/mapper/tempdb_vg-tempdb_lv
We then, as a best practice, run tune2fs against new file system.
sudo tune2fs -i 0 -c 0 /dev/mapper/data_vg-data_lv
sudo tune2fs -i 0 -c 0 /dev/mapper/logs_vg-logs_lv
sudo tune2fs -i 0 -c 0 /dev/mapper/tempdb_vg-tempdb_lv
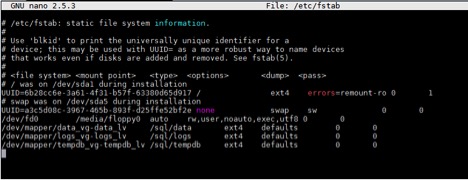
We now need to make entries into /etc/fstab to allow these file systems to be mounted and persisted between restarts.
sudo nano /etc/fstab
Add these lines to the file to allow them to be mounted:
/dev/mapper/data_vg-data_lv   /sql/data   ext4   defaults 0   0
/dev/mapper/logs_vg-logs_lv   /sql/logs   ext4   defaults 0   0
/dev/mapper/tempdb_vg-tempdb_lv   /sql/tempdb   ext4   defaults 0   0
We can mount the three directories:
sudo mount /sql/data
sudo mount /sql/logs
sudo mount /sql/tempdb
We now have a production grade disk subsystem to support the configuration.
Configuring SQL Server
Most settings are still accessible via SSMS, but there are some that need to be configured using the mssql-conf command.
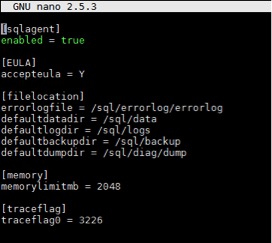
Running these commands will adjust the defaults to settings we recommend for a standard configuration, obviously the 2048 memory setting is a place holder and should be adjusted to meet the memory needs on your installation.
sudo /opt/mssql/bin/mssql-conf set filelocation.defaultdatadir /sql/data
sudo /opt/mssql/bin/mssql-conf set filelocation.defaultlogdir /sql/logs
sudo /opt/mssql/bin/mssql-conf set filelocation.errorlogfile /sql/errorlog/errorlog
sudo /opt/mssql/bin/mssql-conf set filelocation.defaultbackupdir /sql/backup
sudo /opt/mssql/bin/mssql-conf set filelocation.defaultdumpdir /sql/diag/dump
sudo /opt/mssql/bin/mssql-conf set memory.memorylimitmb 2048
Trace Flags are set using the same command, but with a slightly different format.
sudo /opt/mssql/bin/mssql-conf traceflag 3226 on
The final step in the process is to restart SQL Server.
sudo systemctl restart mssql-server
The end result of these changes is the configuration file, /var/opt/mssql/mssql.conf.
This file can also be edited directly:
sudo nano /var/opt/mssql/mssql.conf
Once configured, this file can be used as a template for future builds.
We now want to move the system databases from their current shared location to dedicated drives.
The master database has associated mssql-conf settings for data and log, which we will adjust in conjunction with moving the files.
sudo /opt/mssql/bin/mssql-conf set filelocation.masterdatafile /sql/data/master.mdf
sudo /opt/mssql/bin/mssql-conf set filelocation.masterlogfile /sql/logs/mastlog.ldf

sudo systemctl stop mssql-server

sudo mv /var/opt/mssql/data/master.mdf /sql/data/master.mdf
sudo mv /var/opt/mssql/data/mastlog.ldf /sql/logs/mastlog.ldf
sudo systemctl start mssql-server
There is no configuration setting within mssql-conf for msdb or model, therefore we first use TSQL to alter the file locations.
USE master
GO
ALTER DATABASE msdb MODIFY FILE (NAME = MSDBData, FILENAME = '/sql/data/msdbdata.mdf');
ALTER DATABASE msdb MODIFY FILE (NAME = MSDBLog, FILENAME = '/sql/logs/msdblog.ldf');
GO
Next switch to Linux to stop, move and restart.
sudo systemctl stop mssql-server
sudo mv /var/opt/mssql/data/msdbdata.mdf /sql/data/msdbdata.mdf
sudo mv /var/opt/mssql/data/msdblog.ldf /sql/log/msdblog.ldf
sudo systemctl start mssql-server
And again for the model database.
USE master
GO
ALTER DATABASE model MODIFY FILE (NAME = modeldev, FILENAME = '/sql/data/model.mdf');
ALTER DATABASE model MODIFY FILE (NAME = modellog, FILENAME = '/sql/logs/modellog.ldf');
GO
sudo systemctl stop mssql-server
sudo mv /var/opt/mssql/data/model.mdf /sql/data/model.mdf
sudo mv /var/opt/mssql/data/modellog.ldf /sql/logs/modellog.ldf
sudo systemctl start mssql-server
For TempDB the process aligns with Windows, add/edit files and restart SQL Server. We will also need to delete the old files.
USE master
GO
ALTER DATABASE TempDB MODIFY FILE (NAME = Tempdev, FILENAME = '/sql/tempdb/tempdb.mdf', SIZE = 1GB, FILEGROWTH = 1024MB )
ALTER DATABASE tempdb ADD FILE ( NAME = Tempdev02, FILENAME = '/sql/tempdb/tempdev02.ndf', SIZE = 1GB, FILEGROWTH = 1024MB )
ALTER DATABASE TempDB MODIFY FILE (NAME = Templog, FILENAME = '/sql/logs/templog.ldf', SIZE = 512MB, FILEGROWTH = 128MB )
GO
Then restart SQL Server:
sudo systemctl restart mssql-server


sudo rm /var/opt/mssql/data/tempdb.mdf

sudo rm /var/opt/mssql/data/templog.ldf
Backups and Maintenance
The latest version of Ola Hallengren’s scripts now support SQL on Linux, so we can just download the MaintenanceSolution.sql file, adjust the backup path to the Linux path we defined, /sql/backup, and schedule within the SQL Server Agent as normal.
The only functionality missing is the auto cleanup of the backup files, which can be accomplished with a BASH script or using PowerShell (which can now be installed on Linux).
To upload and download files from the Linux server, SFTP is recommended. There are a number of tools to do this, but PuTTy and MobaXterm are a couple of the more popular choices.
Database Mail
The configuration for database mail in SQL Server on Linux is predominantly the same as we are used to with other versions of SQL Server.
We configure the mail account details and define a profile. We then use the mssql-config command to associate that profile and restart SQL Server.
sudo /opt/mssql/bin/mssql-conf set sqlagent.databasemailprofile default
sudo systemctl restart mssql-server
The remaining configuration items are generic to Linux or Windows and can be set within SSMS, we have an existing blog here that can be used as a reference to finish your build.
Our next blogs in this series will cover adding this Linux server to Active Directory (to allow Windows authentication) and working with Availability Groups to provide some HA protection.