House of Brick Senior Consultant
Updated: Jan. 27, 2016
While there are many blog posts about installing SQL Server, there are far fewer that discuss the non-install items that should be completed to make your SQL Server system run better and provide greater throughput. This post will show several of the most significant performance items that should be done as part of any SQL Server install. These are true whether you are installing on a physical or virtual system.
While the examples shown here are for Windows 2008 and SQL Server 2008R2 and 2012, the steps are largely the same for all releases of Windows and SQL Server.
These are not intended to be the complete set of items to be addressed before, during, and immediately after installation, but they are the ones that have the largest performance impact.
Power Setting
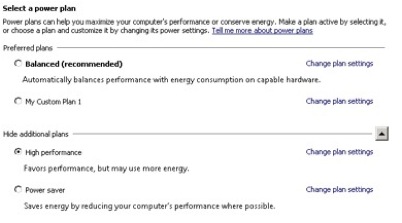
Power Options (Control Panel > Power) allows the administrator to select whether to have the Windows operating system in a power-restricted mode or not. We always recommend “High Performance” or a custom plan that never shuts off the computer for Windows 2008+ since we do not wish SQL Servers to be running any kind of restricted mode. The default value is “Balanced”.
If you are running Windows 2003 this should be set to “Always On”.
Disk Alignment and Partition Offsets
There are several good whitepapers and blog posts on this issue, including this blog post from Jimmy May at Microsoft. Jimmy’s blog post does a great job of explaining the issues with alignment and offsets in detail. The bottom line is this: disk partitions created under Windows 2003 and earlier typically have a partition offset (leading block) of 31.5 KB, and a desirable offset is usually a multiple of 64 KB (the SAN stripe size). The stripe size is determined by the SAN or disk being used. The default offset for new disks created under Windows 2008 and above is 1024 KB, which is 64*16, although some SAN tools change this as well. As demonstrated in the above reference article, there can be large I/O penalties for having misaligned disks.
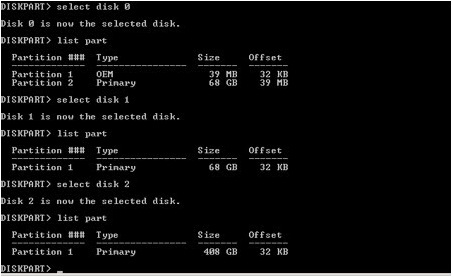
To determine the partition alignments use the Windows DISKPART command line utility. For all drives housing SQL Server data, log, or backup files the offset should be 1024 KB. Not having this set properly (as shown below) can result in significant performance degradation.
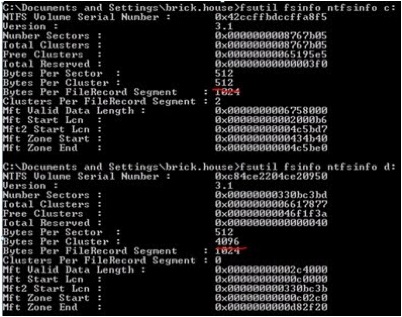
As long as we’re discussing disk, the recommended file allocation unit (cluster) size for SQL Server data and log drives is 64 KB (65536 bytes), since this is one full extent (eight 8KB pages) in SQL Server. (Note that this is not true for operating system drives, file share drives, etc., which function well with the default 4 KB [4096 bytes] cluster size.) Using a cluster size other than 64 KB will have a performance impact, though it will be less than that of using an incorrect offset.
This can be discovered by looking at the Bytes Per Cluster using the fsutil command as shown below.
Finally, let’s look at disk allocation. For our installations we always request the following drives be allocated:
- Windows and non-SQL Server software (usually the C: drive)
- SQL Server installation drive for the non-database components
- SQL Server data
- SQL Server logs
- TempDB Data
- SQL Server backups
This provides the isolation of I/O profiles and activity to ensure good performance.
Instant File Initialization
Instant File Initialization allows files to be created without having to spend time zeroing out the entire size of the file. For example, a 20 GB data file can be added to the server in seconds as an empty file. Whereas, without instant file initialization, the 20 GB file must be written with zeros before it can be used. This is also true as a database file grows over time.
Instant File Initialization is enabled by granting the SQL Server service account the “perform volume maintenance tasks” user right in Local Security Policy >> User Rights Assignment in Windows. If SQL Server runs using a local administrator user ID, it has been implicitly granted this right. If the service account is changed to a domain account, the new account needs to be added to this right.
File Allocations and the Model Database
It is important that the allocations for the data and log files for any database be set to a size that will handle the existing data and leave room for growth. Setting these correctly will eliminate fragmentation and reduce the number of Virtual Log Files (VLFs).
Transaction log files are broken internally (“under the hood”) into pieces called Virtual Log Files (VLFs), and every time a log goes through auto-growth additional VLFs are added to the file. As SQL Server MVP Kimberly Tripp describes in item #8 in her post as well as in this post there are performance issues – sometimes serious performance issues – with having too many (or even too few) VLFs in your transaction log file. A general guideline is to have fewer than 50 VLFs in your log file for any database.
This brings us to the Model database. As you know, the Model database serves only one purpose, to set database parameters like size, recovery model, file location, etc. for a new database created in that instance. Setting the Model database at a size and autogrowth (and, perhaps growth limit) will help reduce fragmentation, VLF’s, and database files being placed on the wrong drive. It will also ensure that the recovery model is set to the proper default. We always set the Model database to some reasonable configuration post-install.
TempDB
Unless directed by Microsoft Support, the greatest number of TempDB data files that are generally useful is one per core, and even this may be excessive. Having too many TempDB data files can actually cause performance issues as described by Microsoft MVP Paul Randal in his article. As Paul notes, the current best practice is actually to have a number of data files equal to ¼ or ½ the number of cores. (It is almost always recommended to have at least two TempDB data files, even with a small number of cores.)
TempDB writes to the data files in a round robin manner provided the files have approximately the same free space. As a result, House of Brick recommends that all TempDB data files in an instance be the same size and have the same autogrowth. These TempDB data files can exist on the same drive but, as noted earlier, TempDB data files should be on their own disk.
Min Server Memory & Max Server Memory
The Max Server Memory and Min Server Memory should be configured so that the SQL Server does not completely consume all of the server’s memory. Not setting Max Memory can cause some interesting performance issues. Max Server Memory should be set, usually 4-8 GB below total system memory, and monitored. Some recommendations say to leave only 300-500 MB of memory free on the server, but this doesn’t account for any other processes, which run on the server like anti-virus scans, updates, and monthly processes. After setting Max Memory, the perfmon counter ‘Memory – available bytes’ should be watched to verify that enough free memory is left available.
Plan Cache
A common waste of memory in SQL Server is in the plan cache. In database systems, query statements are compiled and the generated execution plans are stored in the plan cache for potential subsequent re-use. The problem arises when there are many ad-hoc single use statements whose plans are stored and never re-used, and in some cases waste significant system memory. As the plan cache grows it begins to consume memory previously used for data buffers. This is why plan cache size can impact performance.
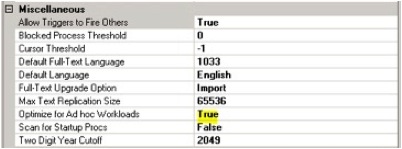
SQL Server MVP Kimberly Tripp has written quite a bit about this topic in her blog and she makes several recommendations with which House of Brick agrees and recommends to clients. First is to enable the “Optimize for Ad-hoc Workloads” SQL Server instance option on SQL 2008 and higher systems. This option causes a stub of the execution plans for ad-hoc queries to be written to the plan cache on the first execution, thereby saving space. If the ad-hoc query is run again, the entire execution plan is then written to the plan cache.
The second recommendation is to check the amount of the plan cache that is storing single use plans, and if the amount is greater than 500 MB, to periodically clear the ad-hoc cache via the “DBCC FREESYSTEMCACHE (‘SQL Plans’)” command. This specific recommendation is outlined at sqlskills.com. To find the amount of plan cache wasted in this fashion, run the following usage query included in that article against your instance:
SELECT objtype AS [CacheType]

 , count_big(*) AS [Total Plans]

 , sum(cast(size_in_bytes as decimal(18,2)))/1024/1024 AS [Total MBs]

 , avg(usecounts) AS [Avg Use Count]

 , sum(cast((CASE WHEN usecounts = 1 THEN size_in_bytes ELSE 0 END)

as decimal(18,2)))/1024/1024 AS [Total MBs - USE Count 1]

 , sum(CASE WHEN usecounts = 1 THEN 1 ELSE 0 END)

AS [Total Plans - USE Count 1]

FROM sys.dm_exec_cached_plans

GROUP BY objtype

ORDER BY [Total MBs - USE Count 1] DESC
| CacheType | Total Plans | Total MBs | Avg Use Count | Total MBs – USE Count 1 | Total Plans – USE Count 1 |
| Prepared | 27428 | 2810.890625 | 4346 | 612.937500 | 5256 |
| Adhoc | 2971 | 155.046875 | 11649 | 98.820312 | 1133 |
| Proc | 132 | 36.039062 | 19047 | 7.945312 | 42 |
| Check | 9 | 0.226562 | 17 | 0.109375 | 3 |
| View | 512 | 42.046875 | 3049 | 0.031250 | 1 |
| Trigger | 1 | 0.125000 | 25503 | 0.000000 | 0 |
Note the large amount of space used by single-use plans in this example. This is due to the use of dynamic SQL. This indicates that it would be beneficial to systematically clear the procedure cache (via DBCC FREEPROCCACHE) since there are so many single use plans bloating the cache.
Auto-Shrink/Auto-Close
Auto-shrink causes a database to shrink whenever the engine feels like it (it really is about that random) causing massive fragmentation in data files. Auto-close actually stops (closes) the database (not the whole instance, just the individual database) when all connections to that database end. The database has to be restarted and a mini-DBCC run the next time a user or process wants to connect. Both are bad practices that are still in the product only for backward compatibility purposes as described in this article: and in this blog post. No database should have these settings enabled.
Auto-Create and Auto-Update Statistics
Unless you have SharePoint databases in this SQL Server instance, all databases have Auto-Create and Auto-Update Statistics enabled. SharePoint databases should never have auto-create or auto-update statistics turned on. The updating of statistics for SharePoint is handled by a SharePoint process.
Index Maintenance and Database Consistency
We install the Ola Hallengren Maintenance Solution following every install of SQL Server. This product is free and works on every SQL Server release from 2005 to 2014. While the solution has database backups in it, you may or may not want to use them.
You should, however, use the “Index Optimize – USER_DATABASES”, the “DatabaseIntegrityCheck – USER_DATABASES”, and the “DatabaseIntegrityCheck – SYSTEM_DATABASES” to perform index maintenance and check database consistency on a regular basis. These jobs are highly parameterized and can be modified as needed.
Determining Optimum Buffer Count Setting for Database Backups
Use of an increased Buffer Count, can provide significant performance improvements in database backup times. This essentially gives more memory to the backup thread for read buffering. To determine the optimum Buffer Count, perform backup tests like those shown below on a user database. Pick the Buffer Count that gives you the shortest execution time for the backup. This can be used in the Ola Hallengren solution or by using a standard database backup command.
--  Create baseline
backup database ‘foo’ to disk = 'NUL'
go
backup database ‘foo’ to disk = 'NUL' with buffercount=10
go
backup database ‘foo’ to disk = 'NUL' with buffercount=35
go
backup database ‘foo’ to disk = 'NUL' with buffercount=50
go
backup database ‘foo’ to disk = 'NUL' with buffercount=65
go
backup database ‘foo’ to disk = 'NUL' with buffercount=80
go
In this post, I described several of the most significant performance items that should be done as part of any SQL Server install and which should improve your systems’ performance and provide greater throughput.


