


What Is SQL Server Audit?
As database administrators, one of our key responsibilities is to maintain the security and integrity of the database. I have seen many examples where we are engaged to assist customers after a security breach, and in almost all cases there was no auditing mechanism in place. In this blog, I will discuss how to configure SQL Server auditing, using T-SQL code or SQL Server Management Studio, and explore all the available options. Without a proper auditing process running it becomes very difficult for DBAs to answer those questions which will be asked immediately after a security or data breach such as:
- Who accessed the system?
- Who deleted the Sales table?
- Who updated all the customer names to TEST?
SQL Server auditing is an essential tool that enables you to monitor database activity and track changes made to the database to help ensure that you are prepared if you are ever in a situation where your boss is asking these types of questions. The key to being prepared is to make sure you’re auditing your server before, not after, a security breach.
Enabling SQL Server Audit in SSMS
SQL Server auditing provides a valuable layer of security for businesses that handle sensitive data. It enables administrators to monitor database activity, track changes made to the database and identify potential security threats or suspicious activity. Auditing can also help businesses comply with regulatory requirements and internal policies.
Configuring SQL Server Auditing
To configure SQL Server auditing, you need to follow the steps below:
Creating a New Audit
Step 1: Create an Audit
The first step in configuring SQL Server auditing is to create an audit. This involves defining the audit destination (i.e. file or Windows application log) and the audit file size and rollover settings.
Create and Audit using TSQL
To create an audit, use the following T-SQL code:
CREATE SERVER AUDIT [AuditName] TO FILE (FILEPATH = 'C:\Audit\AuditName') WITH (MAXSIZE = 100 MB, MAX_ROLLOVER_FILES = 10, RESERVE_DISK_SPACE = OFF);Create an Audit using SQL Server Management Studio
Expand the security tab – right-click Audits and select New Audit
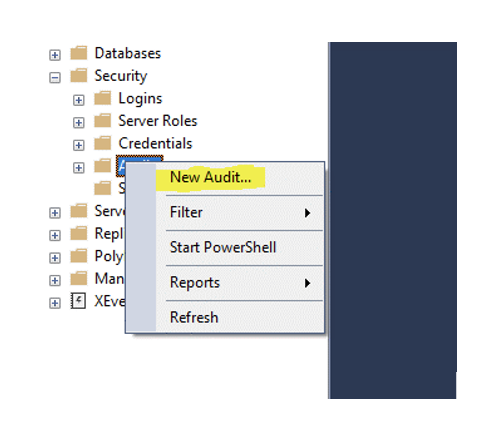
After selecting New Audit – the following window will be displayed:
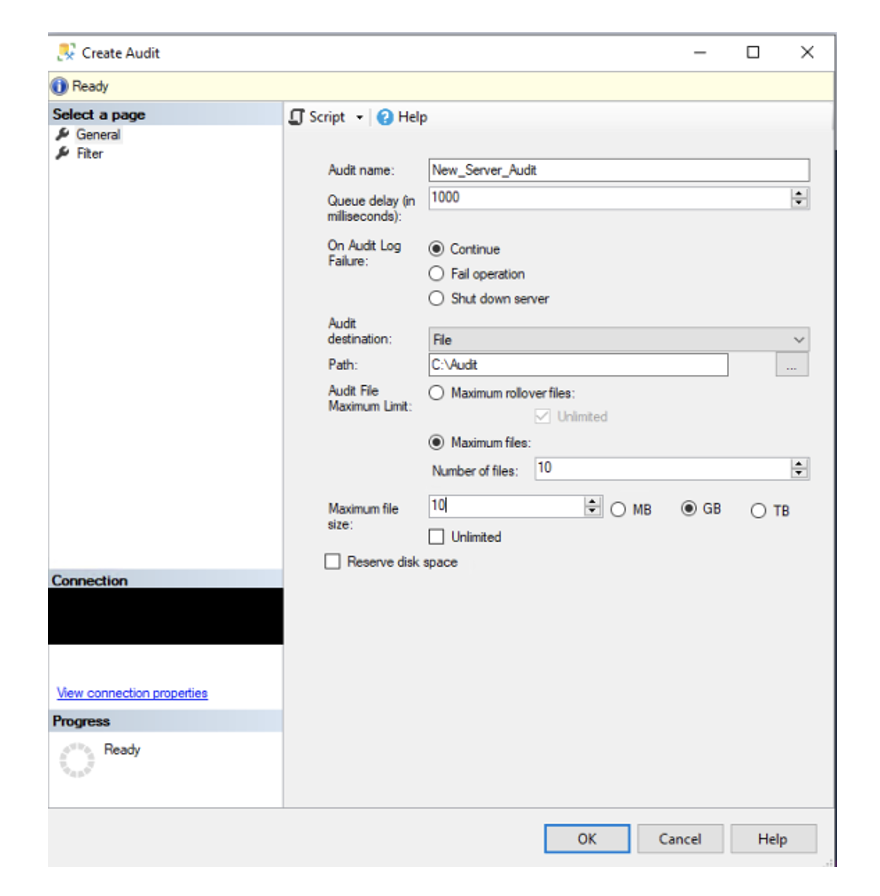
The following options are available on the General page of the Create Audit dialog box:
Audit name
The name of the audit. For this example, we have used New_Server_Audit.
Queue delay (in milliseconds)
Specifies the amount of time in milliseconds that can elapse before audit actions are forced to be processed. A value of 0 indicates synchronous delivery. The default minimum value is 1000 (1 second). The maximum is 2,147,483,647 (2,147,483.647 seconds or 24 days, 20 hours, 31 minutes, 23.647 seconds). HOB recommends a 2 second Queue delay – if the queue delay is set too low – it could cause performance issues on the server – due to the high frequency of writes to the log. If the queue delay is set too high – you could lose some of your Audit events if the server were to go down prior to the events being written to the log.
On Audit Log Failure
Continue (Default)
Auditing is paused. The audit continues to attempt to log events and will resume if the failure condition is resolved. House of Brick recommends accepting the default unless there is an extreme circumstance; for example, if you are auditing unauthorized access and an event is captured you could shut down the instance to prevent anyone from accessing the data until the issue was identified and resolved.
Shut down server
Forces a server shut down when the server instance cannot write data to the audit target.
Fail operation
In cases where the Audit cannot write to the audit log this option causes database actions to fail.
Audit destination
Specifies the target for auditing data. The available options are a binary file, the Windows Application log or the Windows Security log. House of Brick recommends setting the Audit destination to a binary file, so that you can query the data and control the size and number of files being kept on the server.
Audit File Maximum Limit
Maximum rollover files specifies that, when the maximum number of audit files is reached, the oldest audit files are overwritten by new file content. House of Brick recommends 10 Audit files at 100 MB each for a total of 1 GB – the size and number of files can be adjusted to ensure you are meeting the requirements for the audit. The size and number of files should be set based on ensuring you are able to meet the Audit requirements, while ensuring you do not fill up the drive with Audit files.
- Unlimited check box When the Unlimited check box is checked, there is no limit imposed on the number of audit files.
- Number of files box Specifies the number of audit files to be created, up to 2,147,483,647.
Maximum file size
Specifies the maximum size for an audit file in either megabytes (MB), gigabytes (GB) or terabytes (TB).
Reserve disk space check box
Specifies that space is pre-allocated on the disk equal to the specified maximum file size.
Reviewing Your Audit Logs
Optionally, on the Filter page, enter a predicate, or WHERE clause, to the server audit to specify additional options not available from the General page. Enclose the predicate in parentheses; for example, exclude certain login(s) from being captured in the audit logs:
( server_principal_name <> ‘LoginName’
** OR **
server_principal_id <> 12345
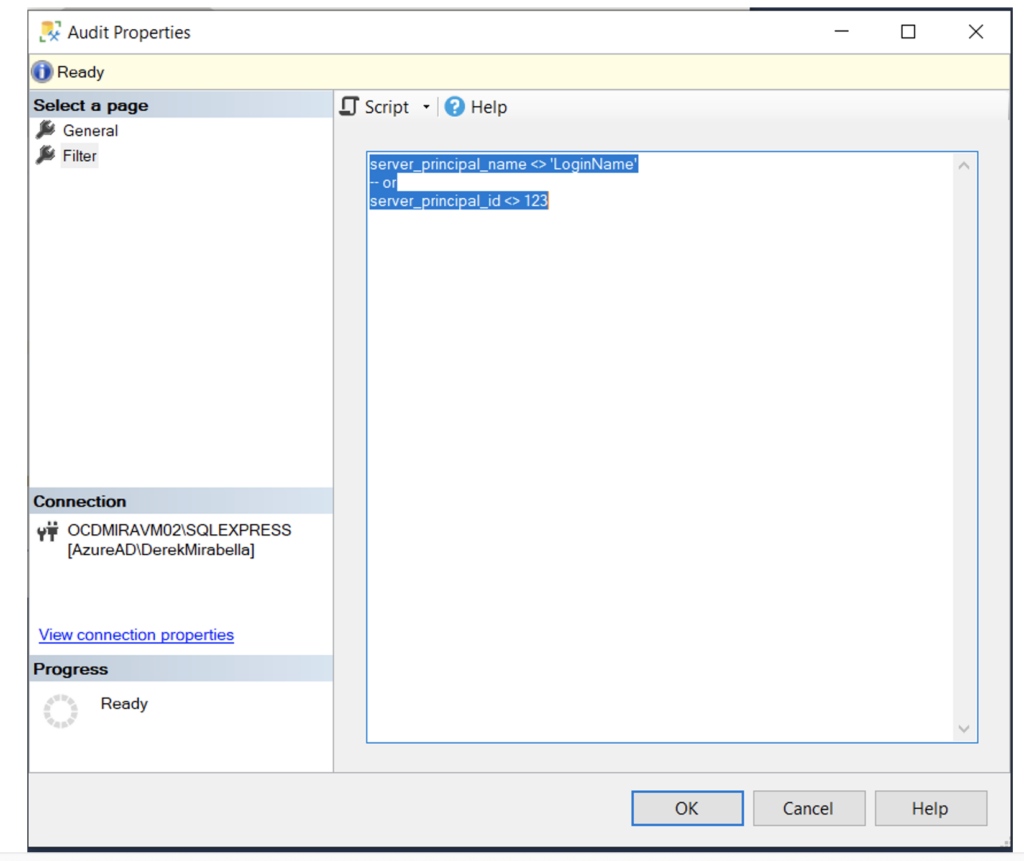
When you are finished selecting options, click OK.
Configuring a Database-Level Audit Specification
Step 2: Create a Server Audit Specification
The next step is to create a server audit specification. This involves specifying the audit events to be captured and the audit destination.
Create a server audit specification using T-SQL
To create a server audit specification, use the following T-SQL code:

CREATE SERVER AUDIT SPECIFICATION [AuditSpecificationName]
FOR SERVER AUDIT [AuditName] ADD (DATABASE_ROLE_MEMBER_CHANGE_GROUP),
ADD (DATABASE_PERMISSION_CHANGE_GROUP),
ADD (DATABASE_OBJECT_ACCESS_GROUP),
ADD (DATABASE_OBJECT_CHANGE_GROUP),
ADD (DATABASE_PRINCIPAL_CHANGE_GROUP)
WITH (STATE = ON);
Create a server audit specification in SQL Server Management Studio
In Object Explorer, click the plus sign to expand the Security folder.
Right-click the Server Audit Specifications folder and select New Server Audit Specification.
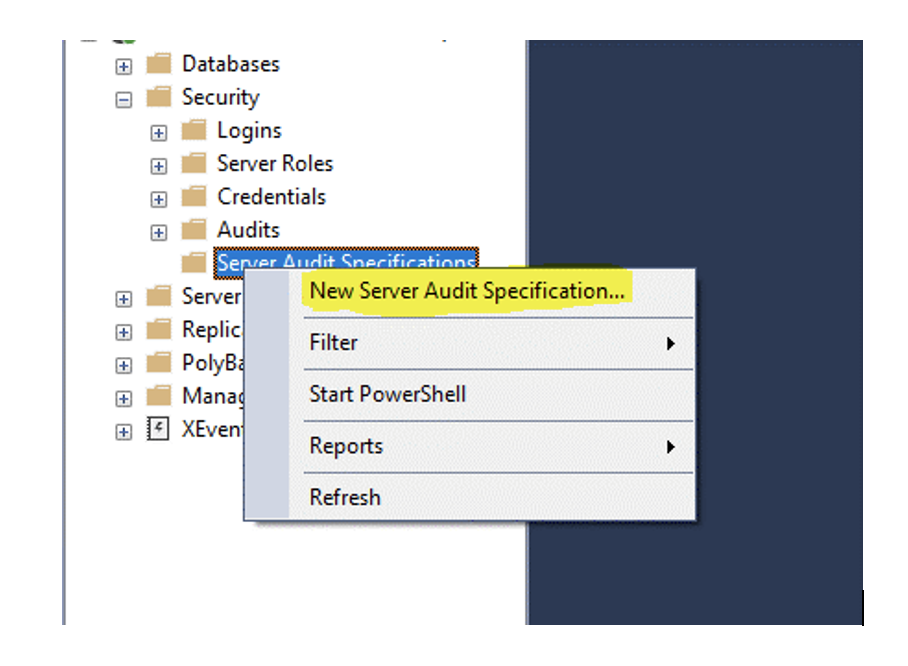
After selecting New Server Audit Specification, the following window is displayed:

The following options are available on the Create Server Audit Specification dialog box:
Name
The name of the server audit specification.
Audit
The name of an existing server audit (a Server Audit must already be configured). In our example from previous step, we used New_Server_Audit
Audit Action Type
Specifies the server-level audit action groups and audit actions to capture. For the list of server-level audit action groups see SQL Server Audit Action Groups and Actions.
Object Schema
Displays the schema for the specified Object Name.
Object Name
The name of the object to audit.
Principal Name
The account to filter the audit by for the object being audited.
When you are finished, click OK.
Step 3: Create Database Audit Specification
Finally, you need to create a database audit specification to capture events at the database level. This involves specifying the audit events to be captured and the audit destination.
Create database audit specification using T-SQL
To create a database audit specification, use the following T-SQL code:
CREATE DATABASE AUDIT SPECIFICATION [DatabaseAuditSpecificationName] FOR SERVER AUDIT [AuditName] ADD (SELECT, INSERT, UPDATE, DELETE ON dbo.TableName BY public) WITH (STATE = ON);Create database audit specification via SQL Server Management Studio
Expand databases – then expand Database you would like to enable auditing on and right-click on New Database Audit Specification.
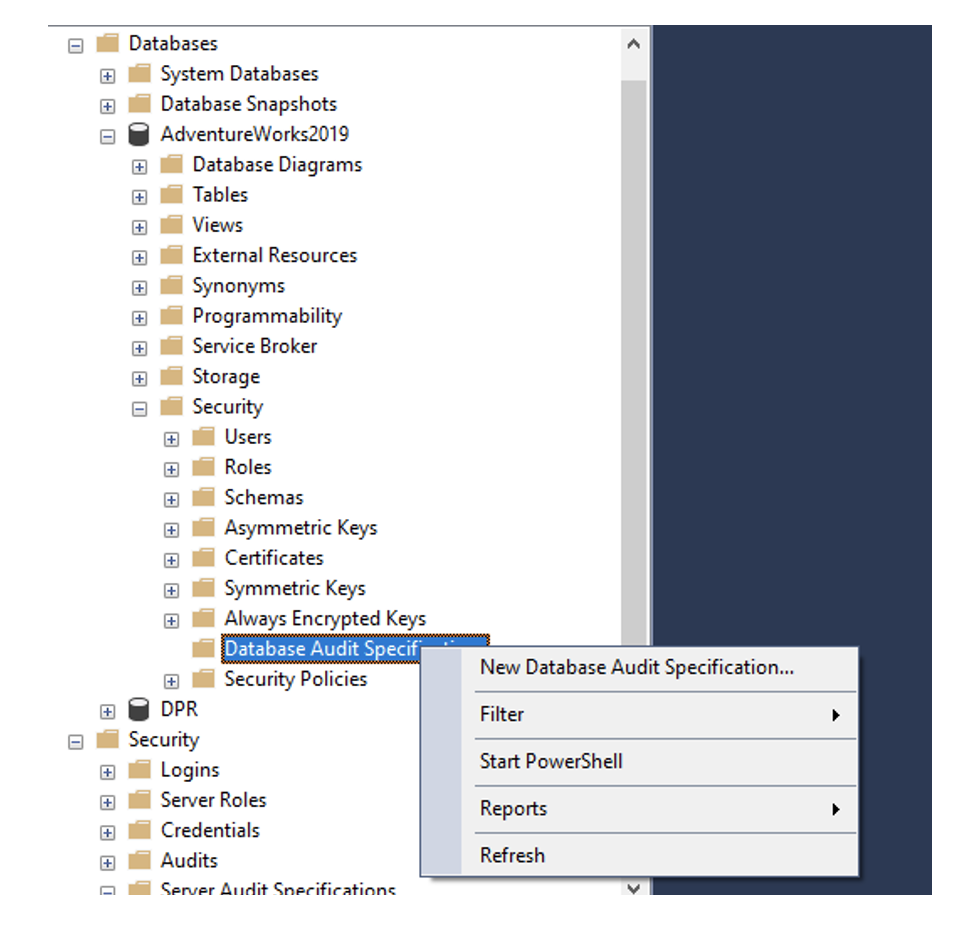
After you select New Database Audit Specification the following window will be displayed:
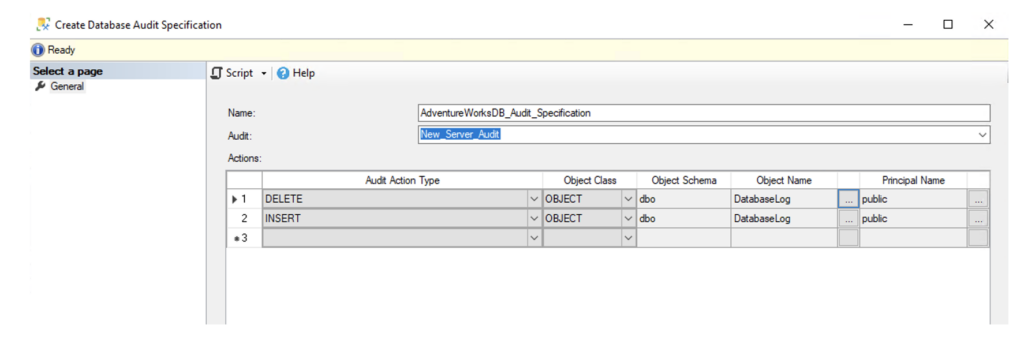
We have added two audits to the AdventureWorks database, both related to the DatabaseLog table; the first one will handle any deletes regarding this table via any member of the public group, the second is for inserts related to the DatabaseLog table via any member of the public group.
The options for the above window are:
Name
The name of the database audit specification.
Audit
The name of an existing server audit object. Either type in the name of the audit or select it from the list.
Audit Action Type
Specifies the database-level audit action groups and audit actions to capture. For a list of database-level audit action groups and audit actions and descriptions of the events they contain, see SQL Server audit action groups and actions.
Object Schema
Displays the schema for the specified Object Name.
Object Name
The name of the object to audit. This option is available only for audit actions.
Principal Name
The account to filter the audit by for the object being audited.
When you finish selecting options, select OK.
Step 3: Enable Auditing
Once you have created the audit and server audit specification, you can enable auditing on the SQL Server instance.
Enabling Audit via T-SQL
To enable auditing, use the following T-SQL code:
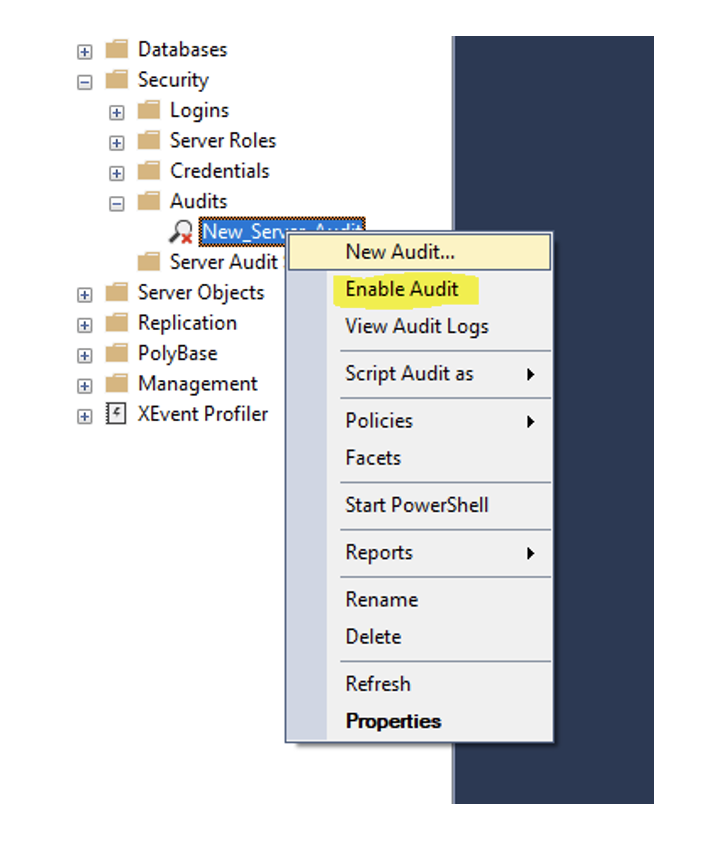
ALTER SERVER AUDIT [AuditName] WITH (STATE = ON);Enabling Audit via SQL Server Management Studio
To enable auditing, right-click the newly created audits and select Enable Audit:
Best Practices for Audit Management
SQL Server auditing is an essential tool for maintaining the security and integrity of the database. Configuring auditing provides a flexible and customizable way to monitor database activity and track changes made to the database.
Troubleshooting Common Audit Issues
This blog gives a high-level overview of a key feature now readily available in almost all versions of SQL, If you think this is something that you would like to enable please reach out to one of our experts today for a quote on making sure that if disaster ever does strike – you will be prepared to answer those questions!
Is Your SQL Server Audit-Ready?
Setting up SQL Server auditing is a great first step, but compliance requires more than audit logs. Our Security and Compliance Assessment evaluates your full database security posture, including access controls, encryption, and licensing compliance.