


Nick Walter, Principal Architect
It seems to be universally true in IT that any tool that promises to simplify and improve our lives comes with a boatload of associated complexity if one wants to leverage the advanced features. That’s certainly true of virtualization. VMware’s VSphere virtualization offers some tantalizing possibilities for automated rapid provisioning of new server environments, but in my experience very few administrators leverage those tools. Instead administrators treat virtualized server platforms exactly like physical server platforms, with heavyweight processes around provisioning a new server.
Automated rapid provisioning can offer some very compelling advantages to any organization that embraces it. Software developers and testers, especially ones using agile methodologies and continuous integration, gain great benefit from being able to rapidly deploy disposable build and test environments where new applications can be tested without fear of side effects. IT staff really enjoy private test environments to perform dry runs on patching or upgrade activities without needing to book lab time. Rapid provisioning can also ease the workload for deploying new servers and applications into production as workloads grow.
In my experience working with House of Brick’s consulting clients, a lot of the IT staff that I’ve talked to would love to be able to do automated rapid provisioning of new VMs for users, but are put off by the perceived difficulties. Many of the concerns I encounter are fears around application configuration or DB configuration. Typically such issues are far more easily resolved than my clients believed possible.
In this series of posts, I’m going to walk through step-by-step a simple, automated Oracle DB VM provisioning scenario. This is a fairly typical rapid provisioning scenario based upon the requests that House of Brick gets from our clients. The target environment will be a VMware VSphere 5 virtualization environment and the goal will be fully automated provisioning of a ready-for-use Oracle virtual machine with less than five minutes of administrator effort required. The example Oracle virtual machine for this exercise will be loaded with Red Hat Enterprise Linux 6 and Oracle Standard Edition 11.2.0.4.
There are a variety of technologies one can leverage for automated rapid provisioning, as my colleague Jim Hannan noted in his blog entry last year. For this particular exercise, we are going to use the simplest approach and rely heavily on templates. VMware virtual machine templates allow rapid creation of virtual machines by allowing them to be copied, with customization as needed, from a master virtual machine image, which serves as the template. Oracle does something very similar with database template files, allowing rapid provisioning of Oracle databases according to pre-set parameters in a template via the DBCA tool. In conjunction with a little bit of shell scripting, these two technologies provide all that we’ll need.
Step 1. Provision the Template Virtual Machine
When creating the template VM, don’t worry too much about sizing vCPU and vRAM amounts. These are all easily changeable later and can be altered during the template deployment. The factor that is difficult to change for rapid-provisioned clone VMs from the template is virtual disk storage. Thus the only part of the template VM that I’m going to be finicky about in this blog is disk storage.
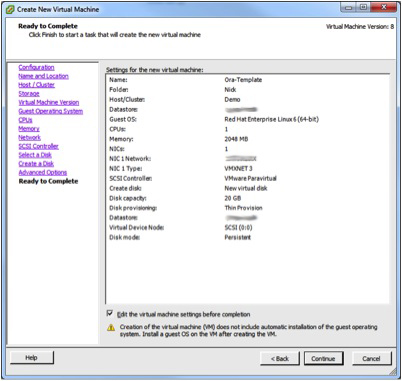
The following table shows the VM configuration I used for my template:
Setting |
Comment |
| 2048 MB RAM | This is adequate to install the O/S and Oracle. Provisioned copies of this template will have RAM adjusted to workload. |
| 1 vCPU | This is adequate to install the O/S and Oracle. Provisioned copies of this template will have CPU count adjusted to workload. |
| CD/DVD Drive | For RHEL6 load. |
| Paravirtual SCSI Controller | Highest performance SCSI controller for RHEL6 Virtual Machines |
| New SCSI Disk – 20GB Thin Provision |
O/S drive, to serve as RHEL6 root file system, swap space, and /boot file system. |
| New SCSI Disk – 15GB Thin Provision |
For Oracle software and Oracle logs. |
| New SCSI Disk – 25GB Thin Provision |
For Oracle database data files and backup. |
To create the template virtual machine, I simply logged into VSphere and hit Ctrl+N to bring up the Create New Virtual Machine Wizard.
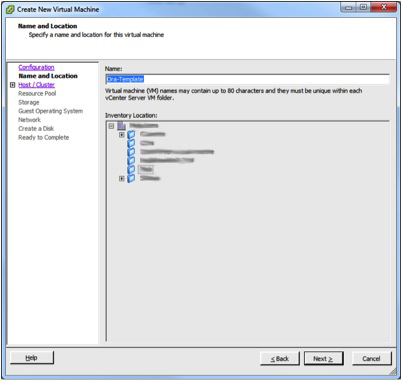
I selected all the options as I normally would to create a new Linux virtual machine and chose only one vCPU with one core and 2 GB of RAM. I allocated one network interface on a typical internal network. I chose one 20GB virtual disk, and I made sure to specify that it was to use “Thin Provision” mode. While a Thick Provision Eager Zeroed disk is the highest performance option for a VM that will be hosting an Oracle workload, I wanted Thin Provision because of the speed boost we will gain when creating the VM initially and when cloning it later as part of our automated deployment. I also made sure to select “Edit the virtual machine settings before completion” so I could further add additional disk space for dedicated Oracle specific file systems.
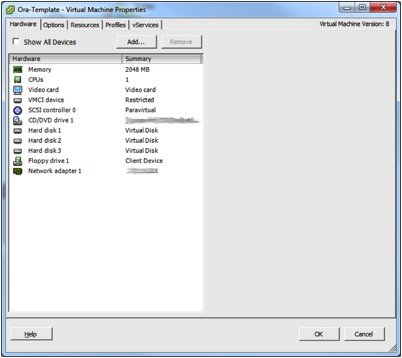
Once in the VM Properties, I chose to configure the virtual CD/DVD drive to connect at power on and to point to the RHEL6 install image ISO hosted on one of my datastores. I also added the two new virtual disks, resulting in the following Virtual Machine configuration:
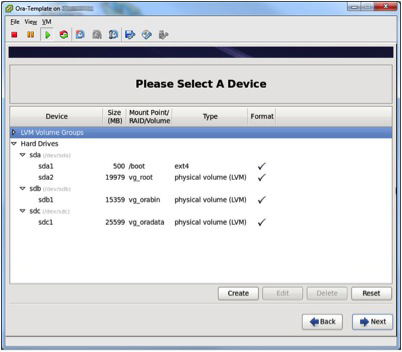
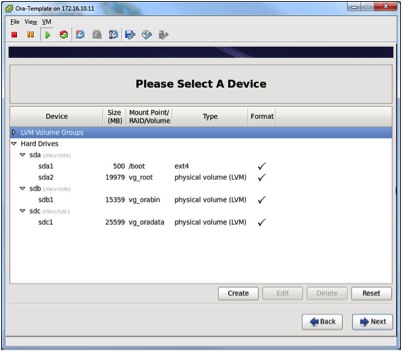
After the VM was created, I opened the VMware console and proceeded to boot the VM and install the O/S as I normally would. The only special consideration I gave was to ensure that the file systems were created appropriately. To accomplish that I chose “Specialized Storage Devices” during the RHEL6 install to ensure that I could select all the drives and choose to have them formatted. Then later I was able to specify my layout to ensure each disk had the appropriate physical and logical volumes created, as well as the appropriate mount points. The screen captures below demonstrate the file system layout I chose for my template VM.
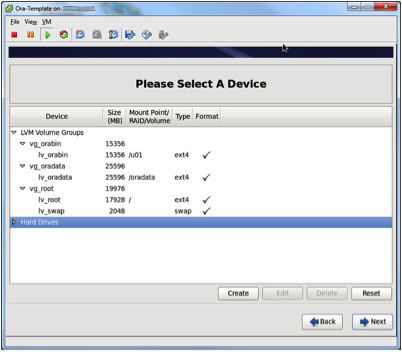
In terms of software packages, I simply chose the Basic Server install. There will be additional packages installed later to satisfy Oracle pre-requisites, but for the moment that’s enough.
Once the O/S was installed I rebooted the VM and logged in to verify everything was healthy.
In this blog post I detailed a basic VM configuration and O/S installation for our rapid provisioning scenario. In the next installment I will cover the Oracle installation.

