


If you currently have Microsoft SQL Server in production use within your organization, then you may often wonder if you have an accurate picture of all those SQL Server databases. Have any of them been upgraded recently? Do you have a mix of Enterprise and Standard editions? Do you have any versions that are now out of support? In this article we will present a way to gather the Version and Edition information from each database in your environment. You can compare that result to your Microsoft license entitlements to see if you have any issues that need to be addressed.
Supported version
As of this writing (2021), SQL Server 2008 and earlier is out of support. Extended Support for SQL Server 2012 will end in July 2022. After that date, no bug fixes or patches for security vulnerabilities will be available. If you still use SQL Server 2012 in production, you should already be planning your migration to newer versions.
The latest release is SQL Server 2019. SQL Server 2022 was announced in Nov 2021 and is expected to ship sometime in mid-2022.
Which Edition?
Microsoft offers a variety of paid and unpaid versions of SQL Server. Here we are only focusing on the Enterprise and Standard editions. When licensing per core, the Enterprise edition is roughly four times the cost of the Standard edition. For smaller workloads, you may find that the Standard Edition is adequate for your needs. While there is no practical limit to the size of your database with Standard Edition, it does limit the size of memory for buffer pools and other features that may affect performance.
One by one
How can you determine which Editions you have installed in your environment? For smaller environments, you can use SQL Server Management Studio to inspect the version or to run a query against each server.
SQL Server Management Studio
Use the SQL Server Management Studio to find your version and edition.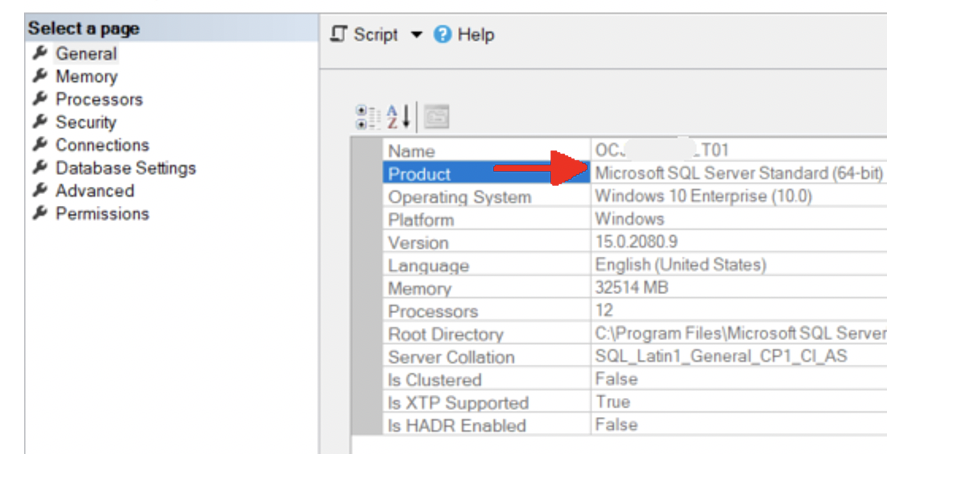
Use the Object Explorer to connect to a server. Once connected, the version information will appear in parentheses. Right-click this object and select Properties. The Server Properties will show you a ‘Product’ string (such as “Microsoft SQL Server Standard (64-bit)”) that includes the Edition (Standard in this case).
You can execute this simple query to display an extended version string with both version and edition information.
SELECT @@VERSION;
PowerShell
For larger deployments, you can use PowerShell to get updated version information for all databases at once. You will need a valid user credential for each database. The following assumes that you have a basic knowledge of PowerShell and have already configured it for your use. The only prerequisite for this method is the “SQLServer” PowerShell module from Microsoft.
By the way, if you are not running PowerShell 5.1 or higher, then stop and upgrade PowerShell first! There is really no good reason to run any earlier version. PowerShell 5.1 came out in 2017 and is backward compatible.
Run $PSVersionTable at a PowerShell prompt to verify your PowerShell version.
There is a great summary here of versions and how to upgrade.
PS C:\> $PSVersionTable

Name                           Value
----                           -----
PSVersion                      5.1.19041.1320
SQLServer module
Writing a script to get updated version information for all databases at once is straightforward with PowerShell. Here we make several assumptions. First, you have a common user/password that is valid in all databases and has been granted sufficient rights to run the Get-SqlInstance command. Next, you have a listing of each computer with SQL Server in a text file. Each computer name should be on a line by itself.
Install the SqlServer module from the PowerShell Gallery. This only needs to be done once.
install-Module SqlServer -force
If you have implemented a database user with Windows Authentication, and you are currently logged in to Windows as that user, your credentials will automatically be used to connect. Something like this command should work for example.
Get-SqlInstance -ServerInstance localhost
If you need to pass in user credentials, store them first like this (replacing MyUser with a valid username):
$Cred = Get-Credential -Message "SQL User" -UserName MyUser
Enter the password in the popup window that appears when running the above command.
Get-SqlInstance
Now you are ready to call the Get-SqlInstance command.
Get-SqlInstance -ServerInstance localhost -Credential $Cred
You should see a result like this:
Instance Name   Version    ProductLevel UpdateLevel  HostPlatform HostDistribution
-------------   -------    ------------ -----------  ------------ ----------------
OCDB01          15.0.2080  RTM          n/a          Windows      Windows 10
Version 15 corresponds to the product SQL Server 2019. You can find an easy-to-read listing of SQL Server version numbers here: https://buildnumbers.wordpress.com/sqlserver/
But what about the edition? The default output of Get-SqlInstance only shows a small selection of properties. If we store the result of the command to an object, it is easier to inspect all the properties that are available.
$Instance = Get-SqlInstance -ServerInstance localhost -Credential $Cred
$Instance.Edition
Standard Edition (64-bit)
Running the script
Now we know enough to build our script! The script will read the list of computers in the file that you created. The Get-SqlInstance command gets a SQL Instance object for each instance of SQL Server that is present on the target computer. For the default instance, we only need to specify the computer name. Your SQLServers.txt might look like this:
SQLProduction01
SQLProduction02
SQLDevelopment01
# Prompt for a valid password

$Cred = Get-Credential -Message "SQL User" -UserName MyUser

# Read your prepared list of computers that are running SQL Server

$ServerNames= Get-Content SQLServers.txt

foreach ($Srv in $ServerNames) {

$Instance = Get-SqlInstance -ServerInstance $Srv  -Credential $Cred

$Instance | Select-Object InstanceName,DomainInstanceName,Version,Edition

}
If your user has sufficient rights to connect to all databases, you can leave out the credentials.
# Read your prepared list of computers that are running SQL Server
$ServerNames= Get-Content SQLServers.txt

foreach ($Srv in $ServerNames) {

$Instance = Get-SqlInstance -ServerInstance $Srv

$Instance | Select-Object InstanceName,DomainInstanceName,Version,Edition

}
The instance name may be in either the InstanceName or the DomainInstanceName property, so both are included in the output. Once you have this script running successfully, you can run it any time you want to check on any version changes in your SQL Server deployments. Remember to first add any new computers running SQL Server to the SQLServers.txt file. You may also want to add a timestamp to the output if you have a need to track your usage and versions over time.
Hopefully this script gives you some confidence in using PowerShell and exploiting the many features of the free SQL Server PowerShell module.
Additional documentation regarding the SQL Server PowerShell module can be found on Microsoft’s website at: https://docs.microsoft.com/en-us/powershell/module/sqlserver/?view=sqlserver-ps
Understanding Microsoft SQL Server licensing can be complex and go beyond just counting cores and users. House of Brick can help you understand your SQL Server licensing footprint and provides services for maintaining the license compliance on an ongoing basis. Visit the following link for more information about House of Brick’s SQL Server licensing services: https://houseofbrick.com/expert-services/compliance-governance/