


Introduction
I recently had the opportunity to work with a client that needed to remove some unused disks from Azure. The guest operating system was Linux, not Windows. This is not such a big deal except that the machine had a lot of disks attached and they were all of a similar size. The question became, how to associate the Azure disks with the Linux representation. If we remove the wrong disk from Azure we could corrupt a database or other unintended filesystem.
Azure Configuration
Below is a screen shot of the Azure configuration for this particular machine. As you can see, there are many disks associated with this VM as this is a database server.
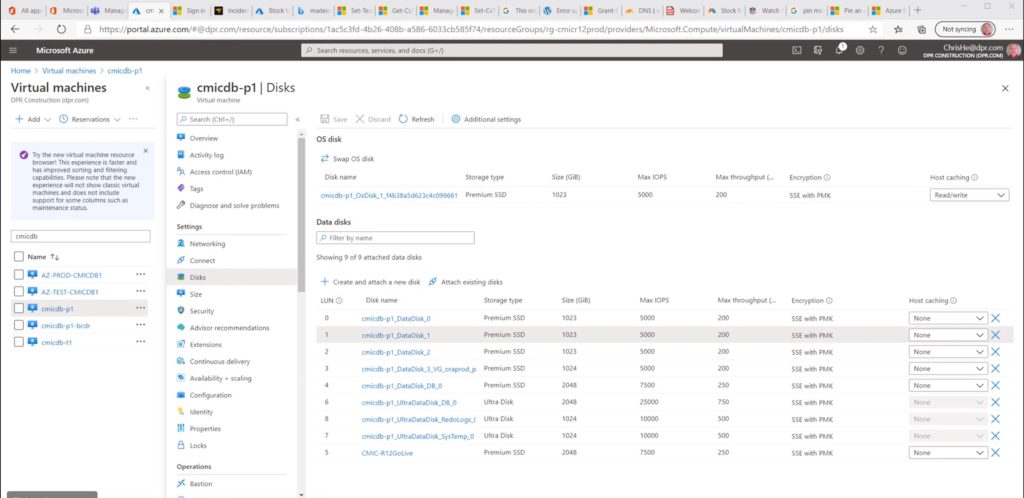
Notice that Azure lists the disks by LUN number. Not in order, but this will be an important detail in the next step.
Mapping Linux Disks to Azure LUNs
We all know that the hardware associated with an Azure virtual machine that Linux sees is virtual. Linux sees the disk devices as SCSI controllers and their respective attached hard drives.
If we run the lsscsi command, we can see all of the controllers and disks that Linux sees.
# lsscsi
[2:0:0:0] disk Msft Virtual Disk 1.0 /dev/sda
[3:0:1:0] disk Msft Virtual Disk 1.0 /dev/sdb
[5:0:0:0] disk Msft Virtual Disk 1.0 /dev/sdc
[5:0:0:1] disk Msft Virtual Disk 1.0 /dev/sdh
[5:0:0:2] disk Msft Virtual Disk 1.0 /dev/sdf
[5:0:0:3] disk Msft Virtual Disk 1.0 /dev/sdd
[5:0:0:4] disk Msft Virtual Disk 1.0 /dev/sdg
[5:0:0:5] disk Msft Virtual Disk 1.0 /dev/sde
[5:0:0:6] disk Msft Virtual Disk 1.0 /dev/sdj
[5:0:0:7] disk Msft Virtual Disk 1.0 /dev/sdi
[5:0:0:8] disk Msft Virtual Disk 1.0 /dev/sdk
The lsscsi command maps the SCSI LUN ID to the /dev/sd* device. The format of the SCSI identifier, example 5:0:0:1, is as follows:
- 5 – SCSCI controller
- 0 – Channel number
- 0 – Target number
- 1 – LUN ID
The LUN ID from lsscsi maps to the LUN identifier in Azure.
In this case, the disk devices are configured using Linux Logical Volume Manager (LVM) with filesystems mounted on top of logical volumes.
/dev/sda2 30G 25G 3.5G 88% /
/dev/mapper/ultra01vg-ultra01v01 1.0T 216G 809G 22% /ultra01
/dev/mapper/ultra02vg-ultra021v01 1.0T 21G 1003G 3% /ultra02
/dev/mapper/migrationvg-migrationlv01 2.0T 71M 1.9T 1% /migration
/dev/mapper/backupvg-backuplv01 1007G 543G 413G 57% /backup
/dev/mapper/db01vg-db01vglv01 2.0T 71M 1.9T 1% /db01
/dev/mapper/ultra03vg-ultra03lv01 2.0T 749G 1.3T 37% /ultra03
/dev/mapper/db02vg-db02vglv01 2.0T 81M 1.9T 1% /db02
/dev/sda1 497M 233M 264M 47% /boot
/dev/mapper/db03vg-db03vglv01 1007G 77M 956G 1% /db03
/dev/sda3 978G 238G 691G 26% /oracle
We want to remove all of the /db0* filesystems as we have migrated the database off of Azure Premium disks to Azure Ultra disks. Clearly, if we detach the wrong disk from Azure the production database will crash. We need to accurately pick the correct Azure disk so we don’t corrupt the production database.
We know that we need to remove the /db01, /db02 and /db03 filesystems. Since LVM is in use, we need to backtrack through the LVM system to get at the Linux physical disk. Using LVM commands vgs and pvs, we can see which Linux disks we need to remove.
Volume Groups:
# vgs
VG #PV #LV #SN Attr VSize VFree
backupvg 1 1 0 wz–n- <1023.00g 0
ultra02vg 1 1 0 wz–n- <1024.00g 0
ultra01vg 1 1 0 wz–n- <1024.00g 0
ultra03vg 1 1 0 wz–n- <2.00t 0
db02vg 1 1 0 wz–n- <2.00t 0
golivepvg 1 1 0 wz–n- <2.00t 0
db01vg 2 1 0 wz–n- <2.00t 0
db03vg 1 1 0 wz–n- <1023.00g 0
Physical Volumes:
# pvs
PV VG Fmt Attr PSize PFree
/dev/sdc1 db01vg lvm2 a– <1023.00g 0
/dev/sdd1 db01vg lvm2 a– <1024.00g 0
/dev/sde1 migrationvg lvm2 a– <2.00t 0
/dev/sdf1 db03vg lvm2 a– <1023.00g 0
/dev/sdg1 db02vg lvm2 a– <2.00t 0
/dev/sdh1 backupvg lvm2 a– <1023.00g 0
/dev/sdi1 ultra02vg lvm2 a– <1024.00g 0
/dev/sdj1 ultra01vg lvm2 a– <2.00t 0
/dev/sdk1 ultra03vg lvm2 a– <1024.00g 0
Now we can map the filesystems in question all the way back to their Azure LUN ID by comparing the output of the pvs command to the output of the lsscsi command.
| Filesystem | Linux Device | Azure LUN ID |
| /db01 | /dev/sdc | 0 |
| /db01 | /dev/sdd | 3 |
| /db02 | /dev/sdg | 4 |
| /db03 | /dev/sdf | 2 |
Linux Removal Steps
We want to remove the disks gracefully from Linux. This consists of filesystem and LVM commands to remove the configuration.
Filesystem
Step one is to unmount the filesystems. Comment out the entries for the filesystems in /etc/fstab and then unmount.
/etc/fstab
# /dev/mapper/db01vg-db01vglv01 /db01 ext4 defaults 0 2
# /dev/mapper/db02vg-db02vglv01 /db02 ext4 defaults 0 2
# /dev/mapper/db03vg-db03vglv01 /db03 ext4 defaults 0 2
Unmount the filesystems:
# umount /db01
# umount /db02
# umount /db03
LVM
With the filesystems unmounted we can clean up the LVM configuration.
Remove the logical volumes.
lvremove -y /dev/db01vg/db01vglv01
lvremove -y /dev/db02vg/db02vglv01
lvremove -y /dev/db03vg/db03vglv01
Now, remove the volume groups.
vgremove /dev/db01vg
vgremove /dev/db02vg
vgremove /dev/db03vg
Lastly, remove the physical volumes.
pvremove /dev/sdc1
pvremove /dev/sdd1
pvremove /dev/sdf1
pvremove /dev/sdg1
At this point, all Linux components have been removed. The disks can now be detached from the Azure virtual machine.
Conclusion
The tricky part about removing storage in a public cloud is figuring out which is the correct disk to remove. Database machines routinely have many disks attached to them. In this blog we show how to accurately identify the correct disk to remove, along with the Linux steps to perform the removal.
In the next blog, we will focus on the intricacies of removing storage in AWS.