


by Joe Grant (@dba_jedi), Principal Architect
This is part two of an ongoing series discussing the installation and configuration of SQL Server on Linux. Technically this is part 2a, and there will be parts 2b and 2c covering the installation of Ubuntu and SUSE as well.
The installation of Linux is a little different when compared to Windows. One key difference is that there are a few additional configuration items that can be set during the installation process. The primary configuration item to have down is the desired filesystem layout and the filesystem sizes.
For this installation I simply created a fairly small two vCPU VM with 4 GB of memory and a 40 GB VMDK. The steps are detailed below.
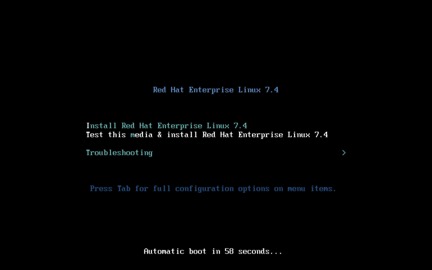
Select ‘Install Red Hat Enterprise Linux 7.4’ to start the installation process. If you accidentally select the media test and install you can hit “esc” to skip the media test.
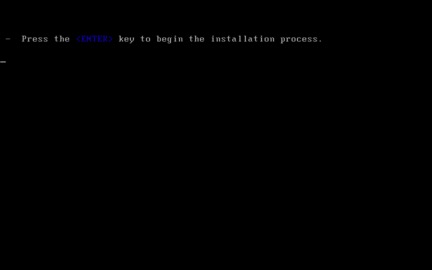
Since this is just a confirmation page, go ahead and hit ‘enter’. You will see a bunch of terminal output scroll, which is normal.
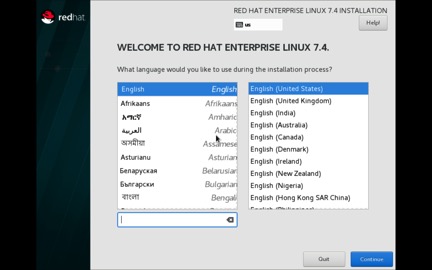
Select the language to use during the installation process.
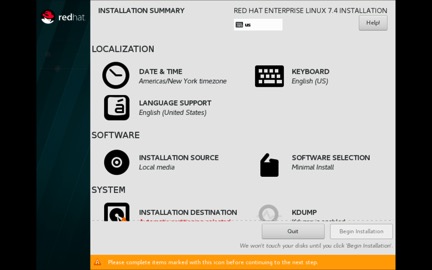
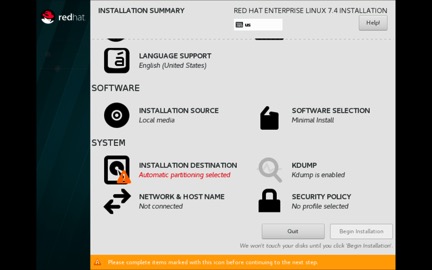
Sorry for the two screen shots, but not everything fit onto the screen. Even though there is no visible scroll bar, it will scroll to get to all of the items. At this point, simply select the configuration items and work through them. The first time through you will probably hit each one. After you have installed Linux a few times you will find that you really only have to work through the following:
- Network & Hostname
- Date & Time
- Installation Destination
- Software Selection
Overall, in each section you will be able to configure the following:
- Date & Time – allows you to configure NTP at installation time. It is dependent on completing the Network & Hostname configuration first.
- Keyboard – allows you to change the keyboard preference. The proper keyboard was likely already detected
- Language Support – allows you to select additional languages to support at the OS level.
- Installation Source – allows you to change the installation media source. Assuming you booted from ISO, you will not have to change this.
- Software Selection – allows you to select the packages to install.
- Installation Destination – allows you to configure the storage.
- KDUMP – allows you to set the parameters for kernel dumps.
- Network & Hostname – allows you to set IP information.
- Security Policy – allows you to… honestly I have no idea. I have never actually looked this one up. I will have to Google it one of these days.
Let’s review the four items noted first, since the remaining items will be left as the default values.
After configuring each item, select the ‘Done’ button in the upper left corner.
Network & Hostname
We start with this one because it is a dependency for the NTP configuration under Date & Time.
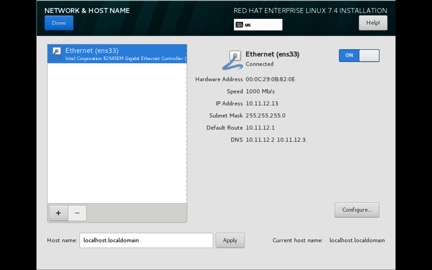
Turn on networking, using the button in the upper right. If DHCP is enabled for the network, an address will be assigned. You can also set the hostname and domain name in the lower left.
For static IP information, select the configure button.
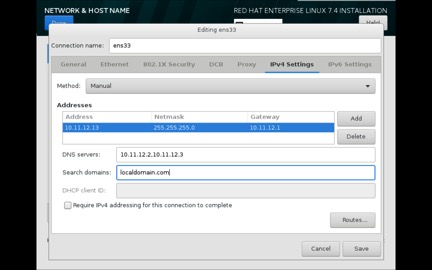
To set IPv4 information:
- Select the IPv4 tab
- Change ‘Method’ to Manual
- Type in the IP address, Netmask, and Gateway info then hit ‘Add’
- Set the DNS servers in a comma delimited list (at least two are required)
- Set the search domain
- Click ‘Save’
To turn off IPv6, simply select ‘Ignore’ from the Method list under the IPv6 Settings tab.
Date & Time
NTP can be configured once networking is functioning. On the main screen, simply select ‘Date & Time’.
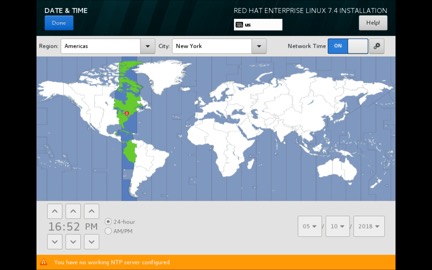
Set the proper time zone and time. It is strongly recommended to set the system to a 24-hour clock. Turn NTP on in the upper right and configure it by selecting the icon with the gears.
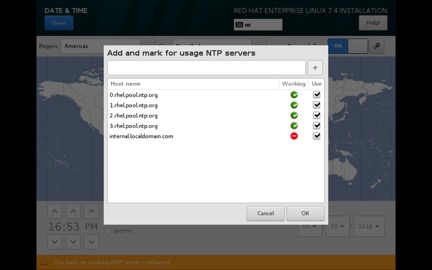
While there are several public NTP servers available by default, you can add your own by typing in the hostname or IP address and selecting the “+” button. Enable the NTP servers to ‘Use’ with a mark in the desired checkboxes.
Installation Destination
This is where the filesystems are defined. In this example, we are going to set the following:
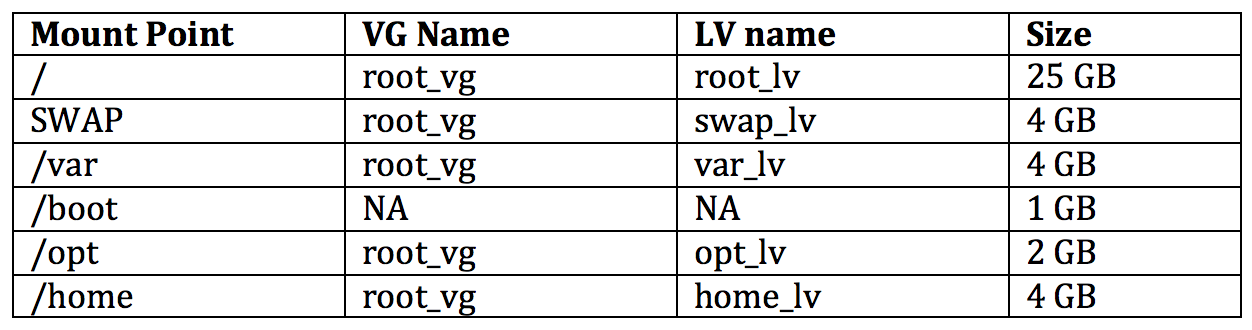
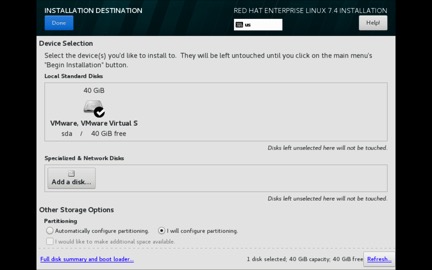
In this case the VM only contains one VMDK, so there is not much choice for the installation destination. Select ‘I will configure partitioning’ to set the filesystems as described in the table above.

There are a lot of steps to this next part. First, start by setting the /boot partition, which is a special partition and needs to be a physical partition rather than part of the LVM.
Select ‘Standard Partition’ in the drop down menu list, and then the “+” button. Select /boot and set the size to 1024 MIB (the screenshot above has a typo – it should be MIB, not MB).
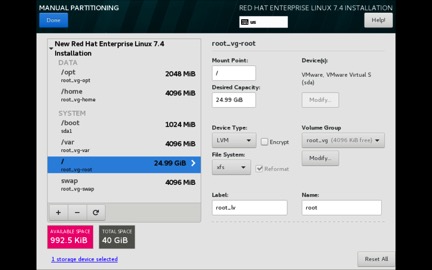
To add a logical volume:
- Select the ‘+”’button
- Set the mount point and size in the pop-up
- On the right panel
– Change device type to LMV
– Select the ‘Modify’ button to change the volume group name (first time only)
– Set the logical volume name in the ‘Label’ text box
– You will need to scroll down (even though there is no scroll bar), and select the ‘Update Settings’ button in order to save your settings
- Lather, rinse, and repeat, to set all of the filesystems
– Set ‘/’ last and simply use the remaining space for it. That is why it is technically 24.99 GB
When you hit the ‘Done’ button on this configuration item, there will be a dialog box to confirm that you want to make the changes.
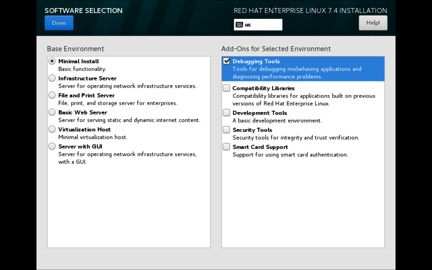
Software Selection
In this example, a minimal installation with debugging tools was selected. This follows the basic best practice of only installing what you absolutely need. The SQL Server installation should then add any of its dependencies.
While not exactly a direct correlation, you can think of a minimal installation as a Windows Core installation. You only get what Linux needs to run, so no GUI. You will likely add your own packages over time, so keep track of what you add for the next install.
Finishing Up
Scroll down on the main screen and select the ‘Begin Installation’ button, and a few more configuration items pop up.

Select ‘Root Password’ (for what is hopefully an obvious reason). Optionally, you can choose to add a user at this point. Personally, I prefer to do this at the command line after installation is complete.
Once all of the packages have been installed, the installer will ask you to reboot by hitting the ‘Reboot’ button in the lower right corner. Once the reboot is complete, you are ready to log in and get started with the next steps, which will be described in part three of this series coming soon.